Manage API Firewall configuration
After you have configured and deployed API Protection for your API, you can update the protection configuration if your API changes, add or remove protection tokens, or change how API Firewall behaves.
Currently, GraphQL APIs are not supported.
View the API Firewall configuration status
You can quickly check if your API has an API Firewall instance protecting it and when the protection configuration was last updated.
- In 42Crunch Platform, go to the API collection you want.
- Check the icons in the Firewall column. These tell you the status of API Firewall for that API, for example:
- If the API has an active API Firewall instance protecting it.
- If the API has a protection configuration but there is no active instance of API Firewall currently running and protecting it.
- If the API does not yet have a protection configuration.
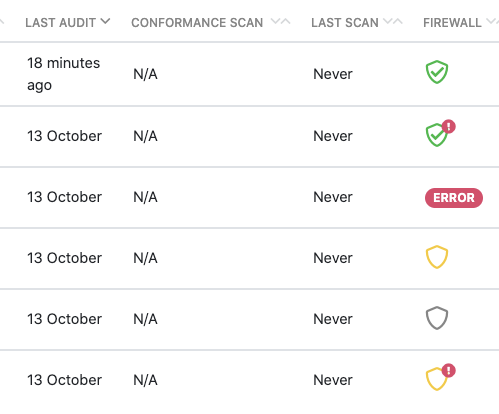
- If an icon has on it, this means that the last attempt to update the protection configuration has failed. This does not mean that your API is no longer protected: the running API Firewall instances are using the last successful protection configuration from before the failed update attempt.
-
If you hover on an icon, you can see when the protection configuration that API Firewall is using was last updated and, in case of failed updates, when the update attempt failed.
- If there is ERROR in the Firewall status column, this means that the Firewall cannot start at all because an error was encountered when compiling the protection configuration. To view the details of the compilation error, click on the status to go to the Protection tab.
Reconfigure API Protection
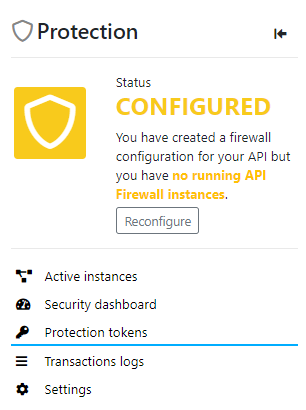
If your API has changed, you can reconfigure its protection configuration. Any active API Firewall instances protecting the API are automatically restarted to run the new configuration.
- Find the API you want, and click to view the API summary. The quickest way to find API definitions in 42Crunch Platform is to click Find API in the main menu.
- Under Protection, click the reconfigure button.
- Confirm reconfiguration, and click Reconfigure.
In the rare case that an API Firewall instance receives a configuration that is not valid and cannot be run, the instance and its Kubernetes pod immediately exit and this is logged in your Kubernetes logs. You can also see this in the details of the API, both in the API collection view and on the Protection tab of the API.
When you reconfigure the protection configuration, the existing associated protection token is not regenerated but stays the same. To change a protection token for an API, you must create the new token manually.
Create or revoke protection tokens manually
You can create more than one protection token for your API, and use them to manage deployments in multiple environments independently of one another. You can also revoke protection tokens that are no longer needed.
If you have several APIs and several environments, it can be difficult to keep track of where each protection token is used. To stay on top of things, in addition to giving descriptive names to protection tokens, use descriptive names for your stored secrets as well, for example, in Kubernetes secrets. We recommend that you include the name of the token and the name or API UUID of the API in the name of the secret. For example, in a Kubernetes secret generic-pixi-protection-token, generic is the name entered for the token when it was created and pixi is the name of the API the token was created for.
- On the Protection tab of the API, click Protection Tokens.
- Click Create Token.
- Enter a unique name for the protection token, and click Generate Token.
- Copy the token value and add it to your secrets.
- To revoke a protection token, click the Revoke button on the token.
If you want to change a protection token that is used in running API Firewall instances, you must reconfigure the firewall instances and redeploy them so that they run the correct protection configuration.
Set API Firewall connect to the platform through a HTTPS proxy
When API Firewall instance starts, an agent component connects to 42Crunch Platform to fetch the protection configuration. During runtime, the same agent also uploads transaction logs to the platform, if you have not changed this default behaviour.
Connecting to the platform is not an issue as long as the firewall instance has direct internet access, but if this connection must go through a proxy, some additional configuration is needed.
- Open the file for configuring the API-specific API Firewall variables. Where this is done depends on the environment of your deployment. For more details, see Deploy API Firewall for your own APIs.
- Add the environment variable
HTTPS_PROXY, and enter the address of your proxy server.The env var
HTTP_PROXYis not supported, the connection must use TLS. - Save the file, and redeploy the API Firewall instance.
Set API Firewall blocking level
By default, active API Firewall instances protecting an API block any transactions that are in violation of the API contract. However, if needed, you can control the blocking level in API Protection and choose what exactly API Firewall blocks.
Changing the blocking level in the API Firewall instance also decreases the level of protection it gives to your API and can leave your API unprotected! The instance continues to execute security policies normally but does not block any transactions, it only reports what would have been blocked. Proceed with caution, and only change the blocking level when absolutely necessary.
- On the Protection tab of the API, click Settings, and choose the version of the image you want to use.
- Choose the blocking level you want to use:
Value Impact 6Custom blocking mode lets you choose how API Firewall treats incoming requests and outgoing responses that have not been described in your OpenAPI definition. This allows you to protect your API progressively as you keep improving on it. You can also choose if you want to include the transaction bodies from requests and responses into the transaction logs that API Firewall writes for further analysis.
Depending on your API, the transaction bodies may contain sensitive or personally identifiable information (PII). If you choose to log the transaction bodies, you should make sure that transaction logs are not stored in 42Crunch Platform. See Switch log destination for API Firewall logs.
Custom blocking mode is only available for API Firewall images
v1.1.1or later.5(default)
In normal operation (full blocking mode), API Firewall blocks all non-conforming traffic, such as:
- Requests to an unknown API
- Requests to an unknown path or operation (method)
-
Requests not conforming to the defined
content-type,schema, or applied protection - Responses with unknown response codes
-
Responses not conforming to the defined
content-type,schema, or applied protection
4API Firewall blocks:
- Requests to an unknown API
- Requests to an unknown path or operation (method)
-
Requests not conforming to the defined
content-type,schema, or applied protection - Unknown response codes
3API Firewall blocks: - Requests to an unknown API
- Requests to an unknown path or operation (method)
-
Requests not conforming to the defined
content-type,schema, or applied protection
2API Firewall blocks:
- Requests to an unknown API
- Requests to an unknown path or operation (method)
API Firewall does not validate any payloads in requests or responses.
1API Firewall blocks:
- Requests to an unknown API
In other words, if the base path of the protected API is, for example,/api/v1, all calls with this base path are accepted even if they are not defined in the OpenAPI definition.
0API Firewall is in listening mode and does not block any traffic, it only reports what would have been blocked. - Save and confirm the changes, and redeploy the API Firewall instance.
API Protection changes the protection configuration for this API to the blocking level you defined. The instance now only blocks the traffic you have chosen to block, and reports on the rest of the traffic what it would have blocked in it normal operation mode. Any active API Firewall instances protecting the API are automatically restarted.
- Open the file for configuring API Firewall environment variables. Where this is done depends on the environment of your deployment. For more details, see Deploy API Firewall for your own APIs .
- Add the environment variable
GUARDIAN_BLOCKING_LEVEL. - Choose the blocking level you want to use:
Value Impact 6Custom blocking mode lets you choose how API Firewall treats incoming requests and outgoing responses that have not been described in your OpenAPI definition. This allows you to protect your API progressively as you keep improving on it. You can also choose if you want to include the transaction bodies from requests and responses into the transaction logs that API Firewall writes for further analysis.
Depending on your API, the transaction bodies may contain sensitive or personally identifiable information (PII). If you choose to log the transaction bodies, you should make sure that transaction logs are not stored in 42Crunch Platform. See Switch log destination for API Firewall logs.
Custom blocking mode is only available for API Firewall images
v1.1.1or later.5(default)
In normal operation (full blocking mode), API Firewall blocks all non-conforming traffic, such as:
- Requests to an unknown API
- Requests to an unknown path or operation (method)
-
Requests not conforming to the defined
content-type,schema, or applied protection - Responses with unknown response codes
-
Responses not conforming to the defined
content-type,schema, or applied protection
4API Firewall blocks:
- Requests to an unknown API
- Requests to an unknown path or operation (method)
-
Requests not conforming to the defined
content-type,schema, or applied protection - Unknown response codes
3API Firewall blocks: - Requests to an unknown API
- Requests to an unknown path or operation (method)
-
Requests not conforming to the defined
content-type,schema, or applied protection
2API Firewall blocks:
- Requests to an unknown API
- Requests to an unknown path or operation (method)
API Firewall does not validate any payloads in requests or responses.
1API Firewall blocks:
- Requests to an unknown API
In other words, if the base path of the protected API is, for example,/api/v1, all calls with this base path are accepted even if they are not defined in the OpenAPI definition.
0API Firewall is in listening mode and does not block any traffic, it only reports what would have been blocked. - If you want API Firewall to treat requests to the API it is protecting differently from requests to unknown APIs, you can also add the environment variable
GUARDIAN_DEFAULT_API_BLOCKING_LEVELas follows:- If you define only
GUARDIAN_BLOCKING_LEVEL, API Firewall applies the blocking level to all incoming requests, no matter if they are to the protected API or to unknown APIs. - If you define only
GUARDIAN_DEFAULT_API_BLOCKING_LEVEL, API Firewall applies the blocking level to all requests to the protected API. Any requests to unknown APIs are blocked. - If you define both
GUARDIAN_DEFAULT_API_BLOCKING_LEVELandGUARDIAN_BLOCKING_LEVEL:- API Firewall applies
GUARDIAN_DEFAULT_API_BLOCKING_LEVELto requests to the protected API. The level can be any of5—0. - API Firewall applies
GUARDIAN_BLOCKING_LEVELto requests to unknown APIs. Only values5(block everything) and0(block nothing) have effect, because levels4—1are compared against the API definition of the API. Levels4—1are treated as level5(the default value).
- API Firewall applies
- If you define only
- Save the file, and redeploy the API Firewall instance.
The instance now only blocks the traffic you have chosen to block, and reports on the rest of the traffic what it would have blocked in it normal operation mode.
If you selected level 0—4 or level 6 without any controls, we recommend you reconfigure the blocking level and return API Firewall to normal operation mode as soon as possible.
Switch log destination for API Firewall logs
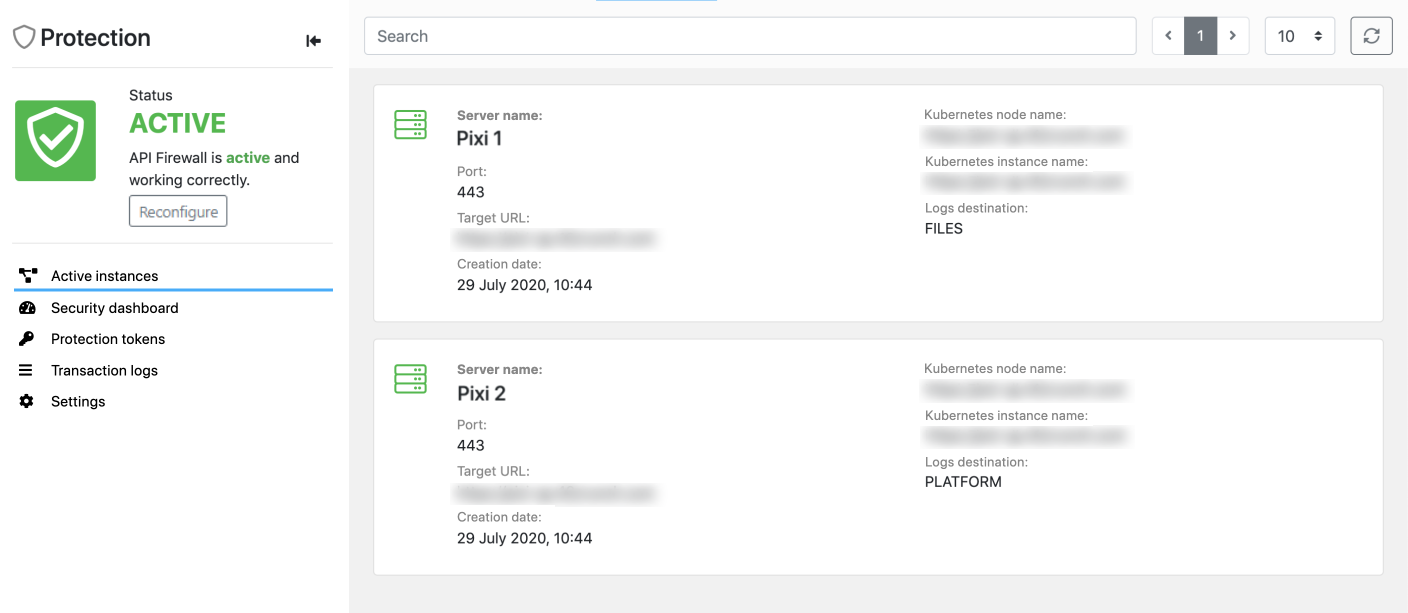
By default, API Firewall publishes transaction logs to 42Crunch Platform. You can switch the log destination to a separate directory you mount in your deployment, or to set logs to be written as standard output.
- Open the file for configuring the API-specific API Firewall variables. Where this is done depends on the environment of your deployment.
- Add the environment variable
LOG_DESTINATION, choose of the following possible values, and save the file: - If you set the destination to
FILESorFILES+STDOUT, mount the directory where you want to publish logs as a volume for/opt/guardian/logs/${GUARDIAN_INSTANCE_NAME}in your deployment.{GUARDIAN_INSTANCE_NAME}, see API Firewall environment variables. - Redeploy API Firewall. The logs are now published to your chose destination.
| Value | Impact |
|---|---|
PLATFORM
|
Transaction logs are published to 42Crunch Platform. Error logs and access logs are written to the file system of the API Firewall container. This is the default value. |
FILES
|
All transaction, error, and access logs are written to a directory that you mount to your deployment as a volume for |
STDOUT
|
All transaction, error, and access logs are written as standard output (STDOUT) to console. |
FILES+STDOUT
|
All transaction, error, and access logs are written to a directory that you mount to your deployment as a volume for |
PLATFORM+STDOUT
|
Transaction logs are published to 42Crunch Platform and written as standard output to console. Error logs and access logs are written to the file system of the API Firewall container and as standard output to console. |
Log destination PLATFORM (alone or with STDOUT) is not suitable for firewall instances running in production environment due to the volume of logs produced. We recommend setting the log destination to FILES or STDOUT (or both) in production or for performance testing.
Using the default size for the container file system is fine for testing, or when you can be sure that the logs volume stays low. However, the volume of logs can rapidly increase, especially in production, so if you want to use PLATFORM or FILES (alone or with STDOUT), you must plan for this growth to avoid running out of disk space in your API Firewall container. Either reserve enough disk space, or mount an external disk as a volume.
If you use only STDOUT, then all logs are pushed out of the container, and container disk space is not a concern.
Depending on the nature of your API, transaction logs could include personally identifiable information that falls under, for example, GDPR regulations. To facilitate the requirements from these regulations, such as the right to forget, it is possible to delete transaction logs from 42Crunch Platform. See Delete transaction logs.
If you switch the log destination away from 42Crunch Platform, you can no longer monitor the real-time traffic there. For more details, see API monitoring.
If you want switch back and publish the logs to 42Crunch Platform again, in addition to changing the LOG_DESTINATION property, you must also unmount the directory you added for the logs. Otherwise, API Firewall might not start correctly.
Stop API Firewall from serving traffic without logs
By default, API Firewall sends transaction logs to 42Crunch Platform. If API Firewall for some reason loses the connection to the platform, it keeps trying to reconnect while continuing to serve API traffic normally to keep your API accessible to your API consumers. However, without the connection it cannot write transaction logs on that traffic.
If you want to send transaction logs to the platform but prevent API Firewall serving API traffic if transaction logs cannot be written, you can do this with the environment variable LOG_STRATEGY.
LOG_STRATEGY is ignored if you have specified in LOG_DESTINATION that transaction logs do not go to 42Crunch Platform.
- Open the file for configuring the API-specific API Firewall variables. Where this is done depends on the environment of your deployment.
- Add the environment variable
LOG_STRATEGY=KILL_ON_PLTF_LOST, and save the file. - Redeploy API Firewall. The API Firewall instance will now automatically stop if it loses the connection to 42Crunch Platform.
Configure health check for API Firewall
API Firewall instances provide a dedicated endpoint /hc for health check calls that, for example, load balancers can use to check that the instance is up and running. By default, the health check calls are over HTTP and use the port 8880, but you can also configure health check calls to use HTTPS connection, in which case they use the port 8843. The API Firewall container (or AWS task) must expose the used port, while the load balancer must not expose it.
Configure health checks over HTTP connection
Health check over HTTP is the simplest option to configure.
- Docker: To check that a container is healthy and the firewall instance is running properly, use the following command as the
CMD/CMD_SHELLargument:"echo $'GET /hc HTTP/1.0\r\n\r\n' | nc 127.0.0.1 8880"
For more details, see the Docker documentation.
- Kubernetes: To configure Kubernetes probes, add the following to your Kubernetes deployment file:
 containers:
      - name: apifirewall
        image: '42crunch/apifirewall:latest'  # replace latest by proper tag in prod environment.
        imagePullPolicy: Always
        livenessProbe:
          httpGet:
            path: /hc
            port: 8880
          initialDelaySeconds: 2
          periodSeconds: 5
For more details on Kubernetes probes, see the Kubernetes documentation.
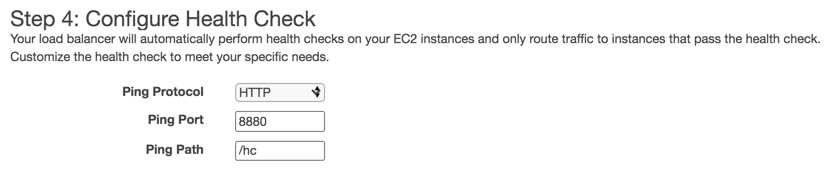
- Load balancer: Configure your load balancer to make health checks using the following settings:
- Protocol: HTTP
- Port: 8880
- Path:
/hc - Return code: 200
The settings may vary depending on your load balancer, for more details, see the documentation of your load balancer. The following shows is an example of configuring the health check in AWS:
You call the health check endpoint from the load balancer with
http://<firewall hostname>:8880/hc.
Configure health check over HTTPS connection
You can change the HTTP health check configuration to use HTTPS connection instead.
- Open the file for configuring API Firewall environment variables. Where this is done depends on the environment of your deployment. For more details, see Deploy API Firewall for your own APIs.
- Add the environment variable
HEALTHCHECK_SSLand set it toonto switch the health check to use HTTPS connection. - Add environment variables to configure the SSL connection, and save your changes:
HEALTHCHECK_SSL_CERT: The filename of the public certificate you have mounted in the directory/opt/guardian/conf/ssl/HEALTHCHECK_SSL_KEY: The filename of the private certificate key you have mounted in the directory/opt/guardian/conf/ssl/
The values for
HEALTHCHECK_SSL_CERTandHEALTHCHECK_SSL_KEYmay be the same as forLISTEN_SSL_CERTandLISTEN_SSL_KEY.
By default, API Firewall useslocalhost:8443as the CN/hostname for the health check, and this should ideally be the same as your certificate CN and the DNS name your health check client connects to. If needed, you can add the environment variableHEALTHCHECK_SSL_SERVERNAMEto specify a different CN/hostname in API Firewall configuration. - Change your health check client to connect to the port
8843over HTTPS. - Redeploy the API Firewall instance.
You can now call the health check endpoint from the load balancer with https://<firewall hostname>:8843/hc.
Switch API Firewall to use HTTP connections
By default, the listener interface of API Firewall only accepts HTTPS connections, and you must specify the variables LISTEN_SSL_CERT and LISTEN_SSL_KEY. If you want to use HTTP connections instead, you can add the variable LISTEN_NO_TLS to your API Firewall configuration.
- Open the file for configuring the API-specific API Firewall variables. Where this is done depends on the environment of your deployment. For more details, see Deploy API Firewall for your own APIs.
- Add the environment variable
LISTEN_NO_TLSand a value to it (for example,LISTEN_NO_TLS=ON,LISTEN_NO_TLS=TRUE, orLISTEN_NO_TLS=1). This variable does not need a specific value, simply adding the variable name is enough, but deploying the configuration fails if a value is not defined. - Save the file, and redeploy the API Firewall instance.
The listener interface of API Firewall now accepts HTTP connections instead of HTTPS connections. The TLS setup is ignored, so you do not need to specify LISTEN_SSL_CERT and LISTEN_SSL_KEY. If you have, you do not need to remove them, these variables are just ignored.
To switch API Firewall back to its default behavior and accept only HTTPS connections, remove LISTEN_NO_TLS from the configuration file, and make sure that the TLS setup is correctly defined, then redeploy API Firewall.
To switch back to HTTPS, you must completely remove the variable LISTEN_NO_TLS from the API Firewall configuration. Changing the value to false does nothing.
Handle CORS requests in a generic way
Cross-origin resource sharing (CORS) allows a server to indicate to browsers to load resources from another origin (such as domain or port) than the one that the server itself exposes. As part of CORS, browsers can send an OPTIONS request to query the supported methods before sending the actual request to access the resources. To handle these OPTIONS calls without having to explicitly define the OPTIONS method in your OpenAPI definition, you can use the extension x-42c-forward-options (see x-42c-forward-options).
- Open your OpenAPI definition for editing, either on the Security Editor tab of the API in 42Crunch Platform or in the editor of your choice.
- To set API Firewall to allow
OPTIONScalls to always pass through, add the extension on the global level of your API:{ "openapi: "3.0.0", "x-42c-forward-options": true, "info": { "version": "1.0.0", ... - If you want API Firewall to allow
OPTIONScalls to pass through only on some API operations and not on others, add the extension on the operations you want:post: description: Creates a new pet in the store. Duplicates are allowed. operationId: createPets x-42c-forward-options: true tags: - pets # ... - When you are ready, save the API definition.
- Reconfigure the protection for the API and redeploy the API Firewall instance for the change to take effect.
Declare caseless file paths
Different systems take different approach to the case of paths in a file system:
- If file paths are case-sensitive, this means paths like
/Sample,/sample, and/SAMPLEare all treated as three separate paths. - If file paths are caseless (not case-sensitive), this means that
/Sample,/sample, and/SAMPLEare treated as one and the same path.
If your API exposes caseless paths of a file system (for example, client-side, server-side, or from a cdn) in its OpenAPI definition, you can add the extension x-42c-caseless-paths (see x-42c-caseless-paths) in your API definition to indicate to API Firewall how the case in file paths should be treated.
- Open your OpenAPI definition for editing, either on the Security Editor tab of the API in 42Crunch Platform or in the editor of your choice.
- Add the extension
x-42c-caseless-pathson the global level of your API:{ "openapi: "3.0.0", "x-42c-caseless-paths": true, "info": { "version": "1.0.0", ...Depending of the value of this property, API Firewall treats the paths in this API definition either case-sensitive or not:
- If set to
false, API Firewall considers file paths in the API to be case-sensitive. This is the default option. - If set to
true, API Firewall considers file paths in the API to be caseless.
- If set to
- When you are ready, save the API definition.
- Reconfigure the protection for the API and redeploy the API Firewall instance for the change to take effect.
Delete protection configurations
You can delete protection configurations that you no longer need. You must stop any active API Firewall instances running the configuration before you can delete it.
Deleting a protection configuration permanently removes it from 42Crunch Platform. This action cannot be undone.
- Find the API you want, and click to view the API summary. The quickest way to find API definitions in 42Crunch Platform is to click Find API in the main menu.
- Under Protection, click Delete configuration.
What is...
API Firewall deployment architecture
Kubernetes Injector for API Firewall
Protections and security extensions
How to...
Deploy API Firewall with Kubernetes Injector
Deactivate automatic contract enforcement in API Firewall
Monitor APIs and API Firewall instances
Learn more...
How API Firewall validates API traffic
x-42c extensions for API Protection and API Firewall