Use API Scan v2 engine
API Scan is a dynamic runtime analysis that runs checks on your live API implementation to discover issues and vulnerabilities in how your API and the backend services behind it behave. Depending on the scan configuration you use, the Scan v2 engine can run different types of scans, while the basics of the underlying scan engine remains the same and works the same way regardless of what type of scan you run.
- The file size of your API should not exceed 10 MB.
- The OpenAPI Specification (OAS) v2, v3.0, and v3.1 are supported. The API definition must be in JSON or YAML format (
.json,.yaml, or.yml).If you import OpenAPI definitions in YAML format to the platform, they are automatically converted and stored in JSON format. However, you can continue to view, edit, and download them in YAML format.
- GraphQL schema definition files (
.graphql,.graphqls,.gql,.gqls,.sdl) are supported. GraphQL introspection files are not supported. - GraphQL data definition files and supergraphs for GraphQL federation are supported.
Support for GraphQL is not enabled by default, but is available as a separate subscription.
The scan generates real traffic to the selected API endpoint and could incur costs depending on your setup.
For best results, make sure that your API definition is valid and well-formatted before you scan it. The API must be deployed so that the API endpoint is live, and the backend server your API uses must be accessible to API Scan. Otherwise the API cannot be scanned.
API Scan can have potential side effects: APIs can throw exceptions, fail, and data can be affected. As per our terms and conditions, you must only run invasive scans, such as conformance scan and fuzzing requests, against APIs that you own, and only against non-production systems and non-production data! Do not run other scan types except the non-invasive drift scan in production environment!
Create a scan configuration
You must create a scan configuration so that API Scan knows which API endpoint to scan and how to run the scan. Scan configuration is also the one that tells scan engine what type of scan to run. For Scan v2 engine, you can have as many scan configurations for a single API as needed, and for OpenAPI definitions you can create scan configurations for different types of scans, not just conformance scan. The scan configuration is generated automatically from the API definition of the API.
Create a scan configuration for an OpenAPI definition
- Find the API that you want to scan. The quickest way to find API definitions in 42Crunch Platform is to click Find API in the main menu.
- Click API Scan > Add configuration, and select what kind of Scan v2 configuration you want to create:
- Version 2: Creates a scan configuration for running conformance scans either on premises or in IDE. This configuration leverages the full capabilities of Scan v2 engine.
- Drift scan: Creates a scan configuration for running a drift scan on premises. Drift scan runs a more light-weight scan to check that your application infrastructure has not changed without any notice, including any 3rd party APIs that you integrate with.
- Enter a name for the configuration. You can also provide a short description of, for example, what this configuration is for, or when it should be used.
- Choose how to create the scan configuration:
- If this is your first scan configuration for this API, select 42Crunch default configuration to create a basic scan configuration based directly on the OpenAPI definition of your API. You can edit this configuration later.
- If you want to use an existing Scan v2 configuration for this API that you have edited and expanded, select Custom configuration in a JSON file and select the file to upload as the new scan configuration. This is especially useful when creating alternative, more complex configurations in an editor of your choice.
- Select which API endpoint to use for the scan, then click Configure authentication.
- Enter all authentication details for your API, and click Configure settings.
- You must provide authentication details for all security schemes defined in your API, or the scan will not run properly.
If you have defined an authentication method in your OpenAPI definition but your API does not actually use it, you can mark it as not required at runtime in your scan configuration to avoid having to provide credentials for it when running the scan.
- The authentication details are stored encrypted as part of the scan configuration in the platform.
Currently, if you export a Scan v2 configuration from the platform, the credentials are exported in plaintext. This will be fixed in a future release.
- You must provide authentication details for all security schemes defined in your API, or the scan will not run properly.
- Configure the settings you want to use. Some settings may be capped lower than what you specify when running the scan in 42Crunch Platform.
- Click Create scan configuration.
You have now created a scan configuration for the API that you selected, as well as a scan token that tells the Scan v2 engine which API to scan and with what settings.
Create a scan configuration for a GraphQL API
You can create scan configurations for GraphQL schema definition files and supergraphs. GraphQL data definition files are scanned as part of the related supergraph and included in its scan configuration, they cannot be scanned as stand-alone files.
- Find the API that you want to scan. The quickest way to find API definitions in 42Crunch Platform is to click Find API in the main menu.
- Click API Scan > Add configuration.
- Enter a name for the configuration. You can also provide a short description of, for example, what this configuration is for, or when it should be used.
- Enter the URL of the server hosting your GraphQL API.
- Click Create scan configuration.
You have now created a scan configuration for the API that you selected, as well as a scan token that tells the Scan v2 engine which API to scan and with what settings.
Provide authentication details for API Scan
For GraphQL APIs, authentication information is not included in the scan configuration by default, because it is completely external to the API definition and cannot be inferred from it. If API consumers — and therefore also API Scan — must authenticate to your API, after creating the scan configuration you must edit it to include the required authentication details.
- Go to the GraphQL API you want, click API Scan, and click on the scan configuration you want to edit.
- Click the Authentication tab, and click Add to create a new security scheme in your scan configuration.
- Enter the required details:
- ID: The name of the security scheme you are adding
- Credential name: The name of the HTTP header that contains the credential
- Credential value: The value of the credential that is inserted in the header
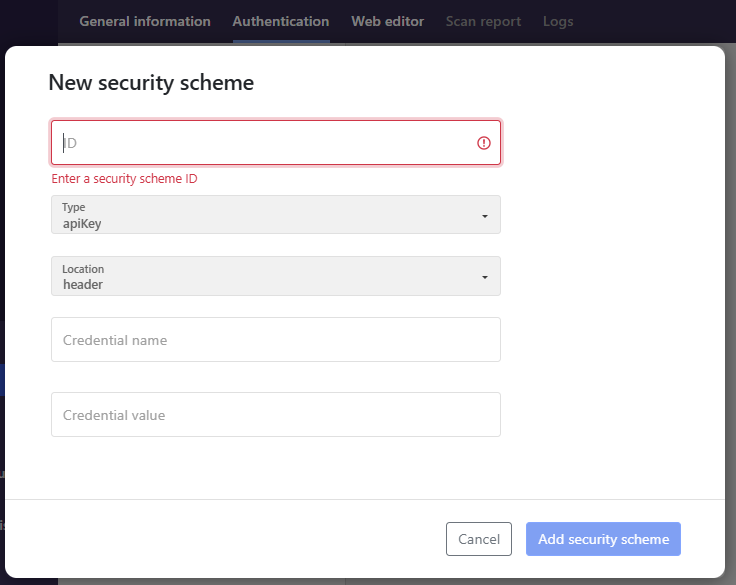
The security scheme is added to the scan configuration as a new authenticationDetails object.
Run a scan
You can run any Scan v2 configuration either in 42Crunch Platform or on-premises. When running the scan in 42Crunch Platform, some settings in the scan configuration may be capped at a lower level than when running the configuration on premises.
Run Scan v2 in 42Crunch Platform
- In 42Crunch Platform, click Scan API.
- Select the API collection, and the API you want to scan, and click Configure general information
- Set scan version to Version 2, and select the scan configuration that you want to use in the scan.
Because GraphQL is only supported in Scan v2, you do not have select the scan version when scanning GraphQL APIs, they automatically always use Scan v2.
- When you are ready, click Run scan.
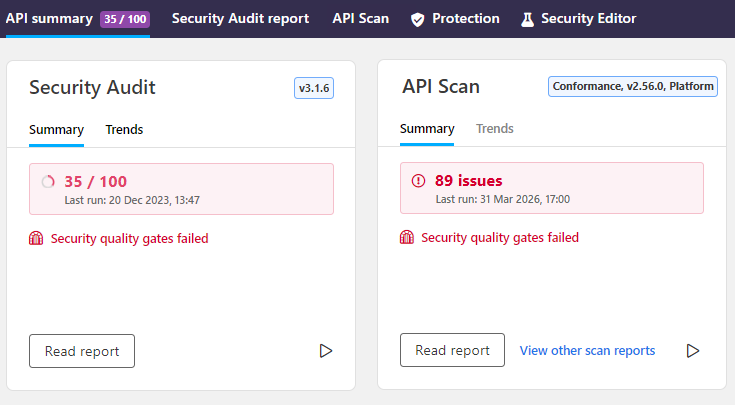
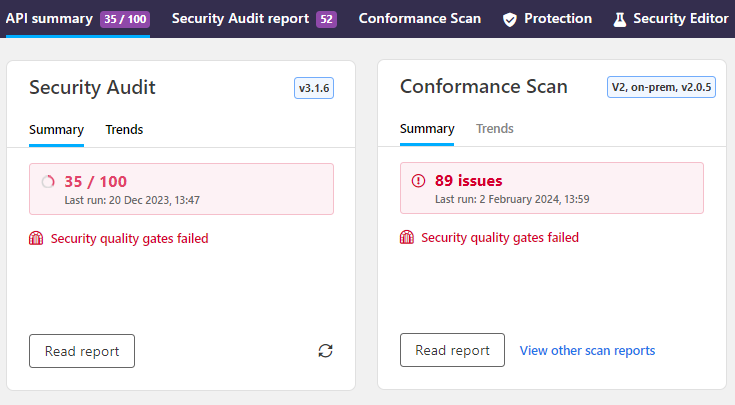
API Scan runs the scan using the scan configuration you chose, and produces a scan report. When the scan is finished, you can see the number of issues and vulnerabilities that the scan found. If API Scan could not scan one or more API operations, for example, because a happy path test failed, the scan is marked as incomplete to reflect that more work is still needed.
Run Scan v2 on premises
You can run any Scan v2 configuration with a scand-agent Docker image. Before you can run API Scan on premises, you must have created a valid scan configuration for the API in 42Crunch Platform and have Docker installed. For more details on Docker, see the Docker documentation.
When the on-premises scan starts, it establishes a two-way, HTTP/2 gRPC connection to 42Crunch Platform at the address services.<your hostname> and the port 8001. Make sure that your network configuration (like your network firewall) authorizes these connections. The on-premises scan uses this connection to verify the scan token and to download the scan configuration you have created. During runtime, on-premises scan uses the connection to send the scan report and logs to the platform.
If you are an enterprise customer not accessing 42Crunch Platform at https://us.42crunch.cloud, your hostname is the same one as in your platform URL.
- Go to the API you want to scan, and click API Scan.
- Find the Scan v2 scan configuration you want to use, click > Copy Docker command, and paste the default Docker command somewhere for further editing.

Scan configurations and tokens are specific to a scan version: you cannot run Scan v2 engine using a Scan v1 scan token, and vice versa. You also cannot run a scan on a GraphQL API with a token for an OpenAPI scan configuration. When running a scan, make sure you specify the right scan token for the API and the scan version you are using, otherwise API Scan cannot use the associated scan configuration and fails to run.
- If your API requires authentication:
- For an OpenAPI definition: Add flags in the command for all required authentication methods you want to use. To find and copy the required environment variables (for example,
SCAN42C_SECURITY_ACCESS_TOKEN), go to the Environment tab, and add those variables to your Docker command, for example:docker run -e SCAN_TOKEN=<your scan token> -e PLATFORM_SERVICE=services.us.42crunch.cloud:8001 -e SCAN42C_SECURITY_ACCESS_TOKEN='<the token value you want to use>' 42crunch/scand-agent:v2
For Scan v2 engine, if you do not provide credentials to all authentication methods listed as required in your scan configuration, API Scan cannot run tests on all API operations because it cannot authenticate to your API. If you have defined an authentication method in your OpenAPI definition but your API does not actually use it, you can mark it in your scan configuration as not required at runtime to avoid having to provide credentials for it.
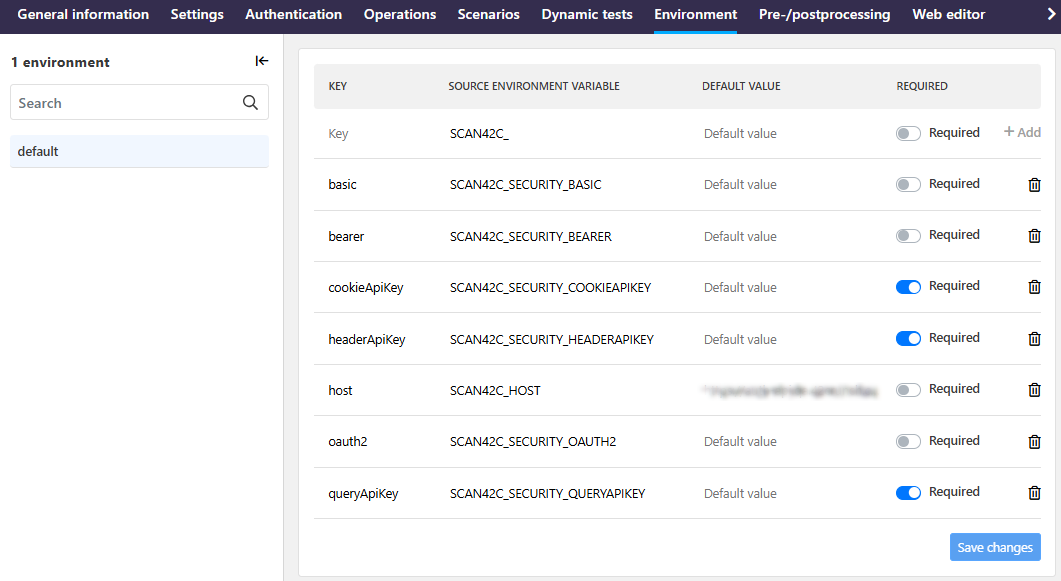
- For a GraphQL definition: If you used a variable for the credential value when configuring authentication in your scan configuration, add flags in the command. To find and copy the required environment variables (for example,
SCAN42C_ENV_VAR), go to the Environment tab, and add those variables to your Docker command, for example:docker run -e SCAN_TOKEN=<your scan token> -e PLATFORM_SERVICE=services.us.42crunch.cloud:8001 -e SCAN42C_ENV_VAR='<the variable value you want to use>' 42crunch/scand-agent:v2
If you did not use a variable when configuring the authentication, you do not need to provide credentials in your Docker command.
- For an OpenAPI definition: Add flags in the command for all required authentication methods you want to use. To find and copy the required environment variables (for example,
- When ready, run your finalized Docker command.
The on-premise scan starts and checks the scan configuration, then runs the scan according to the configuration.
If you are on the API summary page or in the list of scan reports on the UI when the scan finishes, you must refresh the page before the on-premises scan report is available on the UI.
You only need to pull the image when you first run an on-premises scan, or if you want to update the scan image version. For Scan v2 engine, you must always specify the exact image version to use, not latest.
Run on-premises scan behind HTTP or HTTPS proxy
In addition to connecting to the API to be scanned, on-premises scan also connects to 42Crunch Platform when it runs to fetch the scan configuration and to upload logs. This is not an issue as long as the machine it runs on has direct internet access.
However, if the internet access is behind an HTTP or HTTPS proxy, some additional configuration is needed. API Scan uses two environment variables that you must configure depending on which connections must go through the proxy.
- Configure the proxy behavior for your Docker daemon. For more details, see Docker documentation.
- Use the correct command to pull and run the Docker image for the on-premises scan depending on which connections must go through the proxy:
- Scan must connect to 42Crunch Platform through proxy:
docker run -e SCAN_TOKEN=<your token value> -e PLATFORM_SERVICE=services.<your hostname>:8001 -e HTTP_PROXY=<replace with your proxy server address> -e HTTPS_PROXY=<replace with your proxy server address> 42crunch/scand-agent:v2 - Scan must connect to the API through proxy:
docker run -e SCAN_TOKEN=<your token value> -e PLATFORM_SERVICE=services.<your hostname>:8001 -e HTTP_PROXY_API=<replace with your proxy server address> -e HTTPS_PROXY_API=<replace with your proxy server address> 42crunch/scand-agent:v2
- Scan must connect to 42Crunch Platform through proxy:
Replace the placeholders for the variables with the actual values you want to use, and remember to add the environment variables for the authentication details. If you do not need both HTTP and HTTPS proxy, remove the unnecessary one.
View scan reports
When the scan runs, it produces a scan report and scan logs to 42Crunch Platform. You can view the latest scan report for each of your scan configurations in the platform. The exact details of the report depend on the type of the API (OpenAPI or GraphQL) and the type of scan, see Types of scans in API Scan.
- Go to the API you want, and click API Scan.
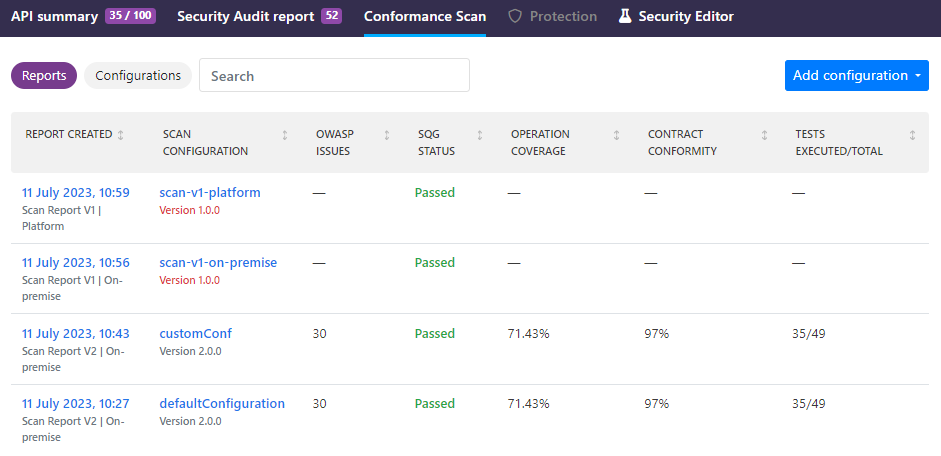
- Click on the time stamp of the report for the scan configuration that you want. You can see the a quick summary of the scan, as well as the list of tests the scan run and the found issues. If you want more room for viewing the test list, you can collapse the summary above it.
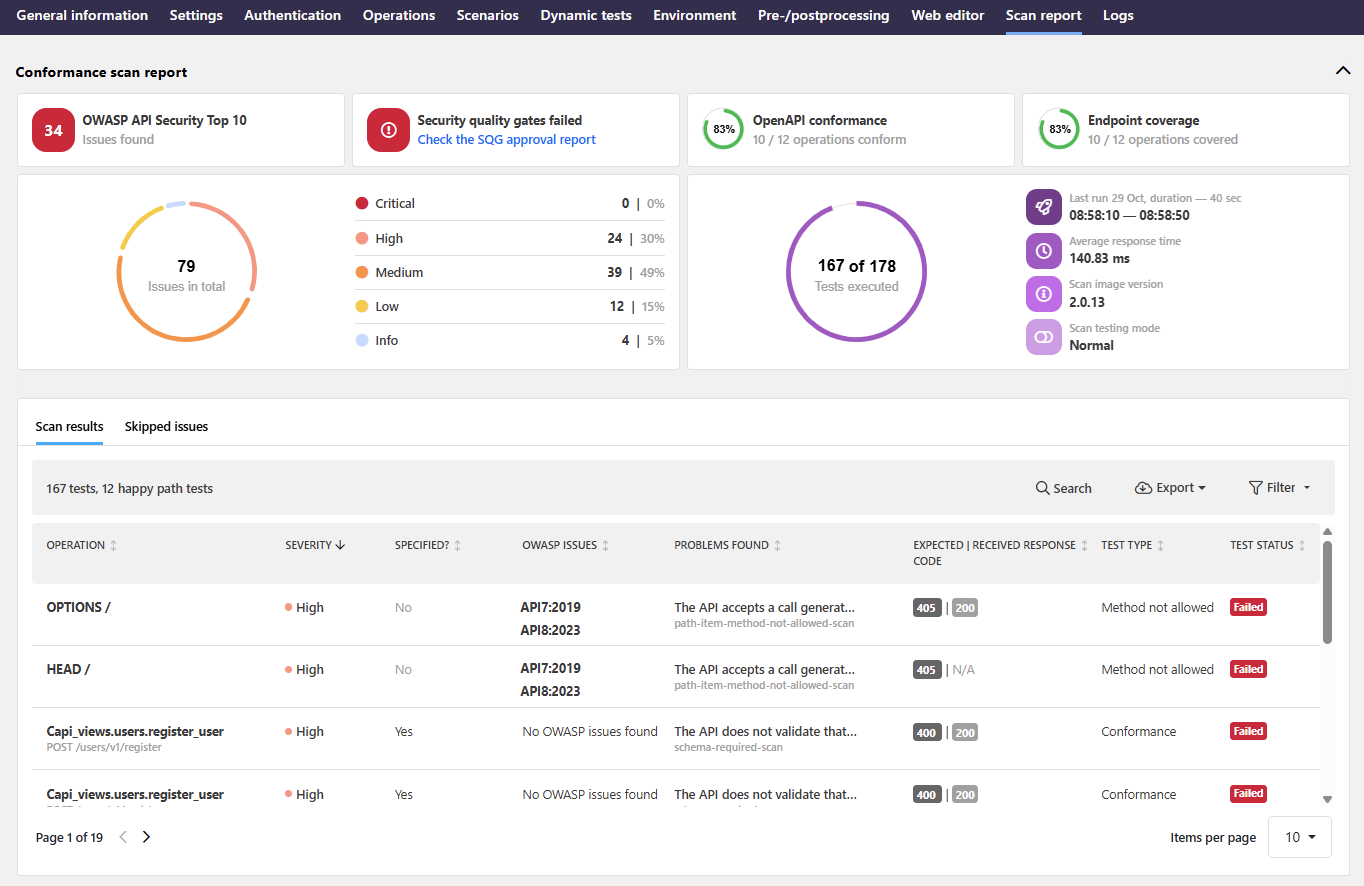
- Use the filters to filter and order what is being shown in the result list, for example, to see where and why happy path tests failed.
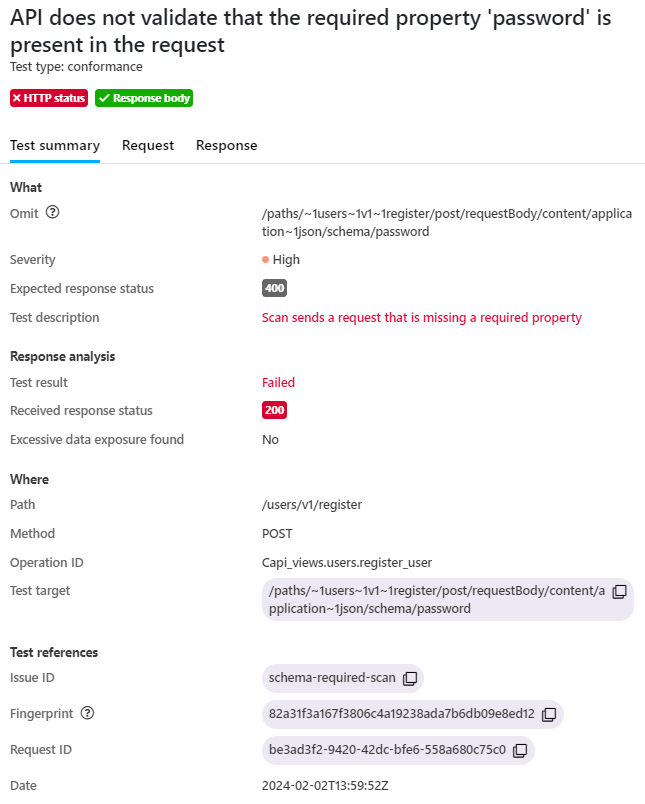
- To view the details of an issue and the test that was run, click the issue on the list.
- If any tests were skipped because of customizations applied to the API, either through customization rules or customizations in the scan configuration, you can see these tests listed on a dedicated tab.
- To view the logs that the scan produced and check how the scan progressed, go to Logs.
Export scan reports
You can export a scan report from 42Crunch Platform to share with others. If you do not want the full report with all the details, you can also export just the found issues as a CSV list.
We recommend you treat the exported report as company-confidential information and store it safely because it can reveal information on security risks in your APIs to outsiders.
- Click API Scan, and go to the scan report you want to export.
- Click Export, and choose what you want to export:
- To export the full report, click Save report as JSON.
- To export just the list of all found issues as CSV, click Save issue list as CSV.
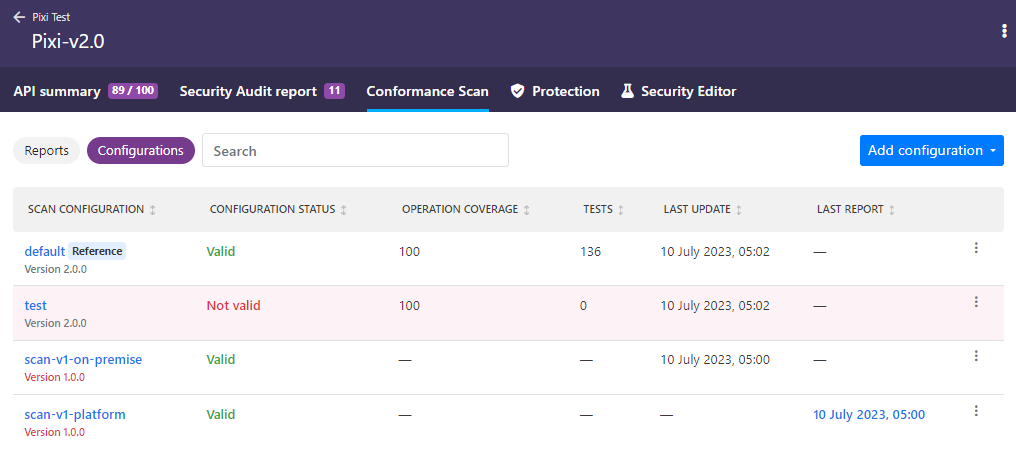
Set a reference scan configuration
Reference scan configuration is the quality reference for the API: the statistics and results from the reference scan configuration are the ones shown, for example, on the API summary page. Once you know which of the scan configurations is most representative of the API as a whole, you can set that one as the reference configuration.
- Go to the API you want, click API Scan.
- Find the scan configuration you want, and click > Set as reference.
The scan configuration you selected is set as the reference scan configuration for your API and its scan status on the API summary page and in the API collection is updated accordingly. If you run scan using another scan configuration, the results shown on the API summary do not change when the scan process finish, but you can view the results of other scan configurations through the list of scan reports.
Because the reference scan configuration is needed to provide scan statistics for your API, you cannot delete that scan configuration before you choose a new reference scan configuration.
Edit a scan configuration
As you use your scan configuration to run scans, you might find that you need to change it to better suit your needs. The changes might be very simple, such as changing the runtime settings that the scan engine uses, or they might be very advanced, such as adding elaborate scan scenarios to test very specific things or complex business flows.
Not all editing options might make sense in all types of scan. For example, a drift scan is not meant by default to fuzz requests, so trying to include fuzzing there might yield unexpected results.
Remember that running invasive scans that can modify data against live APIs in production that you do not yourself own and control is against our terms and conditions and thus not allowed. If you edit your drift scan configuration to include fuzzing on operations that modify data, such as POST and DELETE, you must only run it on your own APIs.
To edit a particular scan configuration, go to the API you want, click API Scan, and click on the Scan v2 configuration you want to edit.
Some configuration tabs are not yet available for GraphQL APIs or drift scan, but the details can be configured on the web editor tab of the configuration, unless otherwise mentioned.
You can move between the different tabs of the scan configuration and save changes to multiple places with a single click. Your changes are persisted even before saving so that you can always go back to a previous tab and check what you did there. If you navigate to the non-editable tabs in the scan configuration, to the Web editor tab, or away from the scan configuration altogether, you are reminded of your unsaved changes and prompted to save them.
Change the scan settings
You can edit the runtime settings that the scan engine uses when it runs a scan on the Settings tab. Because OpenAPI definitions and GraphQL APIs both use the same Scan v2 engine, same settings apply to both types of APIs.
- On the scan configuration, go to the Settings tab,
and change the settings you want.
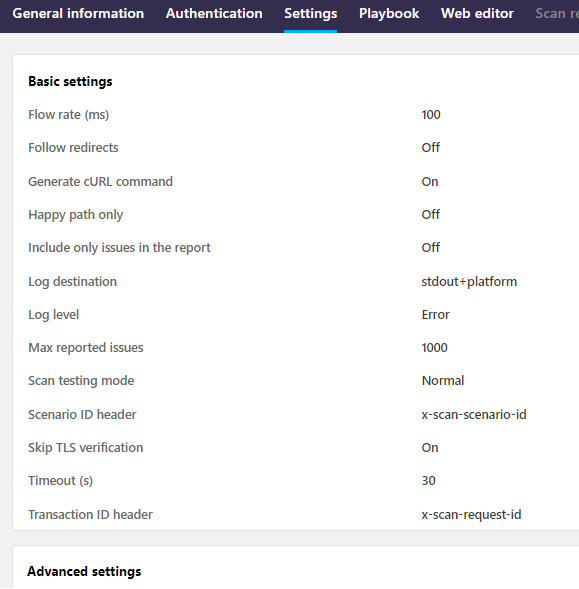
On drift scan configurations and for GraphQL APIs, settings are currently available only on the web editor tab.
You can, for example:
- Change the time limits, like scan duration and timeout, and size limits for the scan report.
If you run API Scan in 42Crunch Platform, you cannot change maximum scan report size. However, when running the scan on premises, you can increase the maximum report size up to 128 MB.
Some scan settings, such as maximum size of the scan report, have an absolute maximum value that you cannot exceed. If you try, your scan might fail or you might not get a scan report. You can check what these values are on your 42Crunch Platform environment, see Check your platform URL
- Leave things that you do not need out of the scan report to keep the file size smaller.
- Change scan behavior, such as following redirects, TLS verification, the flow rate for sent requests, or the testing mode (normal or lax).
- Set the destination where API Scan writes logs and on what level.
If you set the log level to
debugwhen running Scan v2, all the values of all variables in your scan configuration are printed in the clear in the scan logs. Depending on your API, this can include credentials.
For the full list of settings and what they do, see API Scan settings.
- Change the time limits, like scan duration and timeout, and size limits for the scan report.
- When you are ready, click Save changes.
The changes to the configuration are saved and API Scan validates the scan configuration against the API definition of your API. For OpenAPI definitions, if the configuration does not match the contract set out in the API definition, API Scan flags the found errors in the scan configuration validation report (SCVR). You must resolve the errors before the configuration can be used in a scan.
When the configuration is valid, the updated settings are used the next time you run API Scan using this configuration.
If you want to quickly test how changing a setting changes the way the scan operates, you can also specify the value as a flag in your Docker command. The flags must have the prefix SCAN42C_, followed by the name of the setting separated with underscores. For example, if you want to test how including only the found problems in the scan report (reportIssuesOnly) changes things, you would specify -e SCAN42C_REPORT_ISSUES_ONLY=true in your Docker command. The values from the Docker flags override the values in the scan configuration and are only used in that one scan, they do not change the underlying scan configuration.
Edit a scan scenario
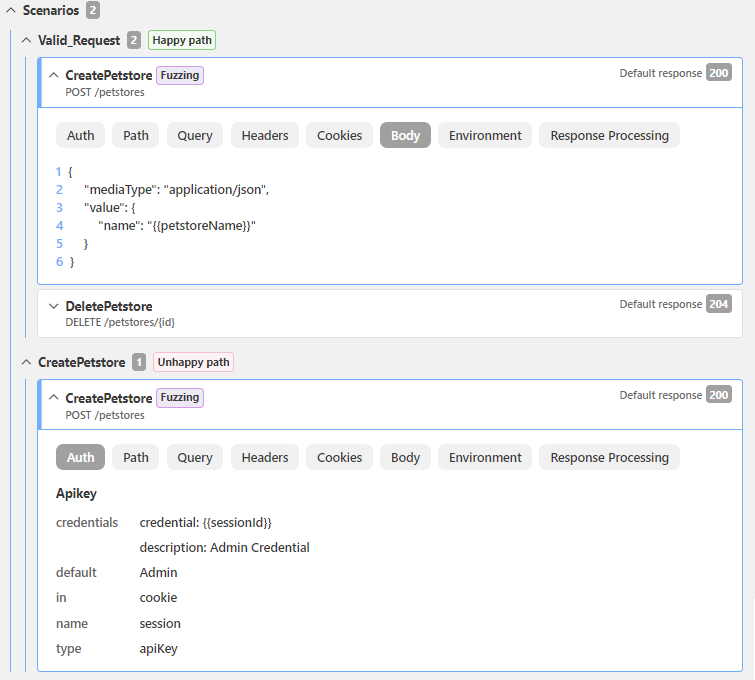
Scan scenarios allow you to configure a flow of requests for testing a particular behavior in your API. They are configured as part of the scan configuration for the API to be scanned. The basic scan configuration already includes scenarios for all operations in your API and you can edit their details as needed.
- On the scan configuration, go to the Scenarios tab.
You can see the scenarios that already exist for each API operation, identified by the
operationId(if available) or the path and method (verb) of the operation. - To view what happens in a scenario, click on the scenario you want. You can see the structure of the scenario and how many items each section has. You can expand the folds to view more details, such as which requests are included in the scenario.
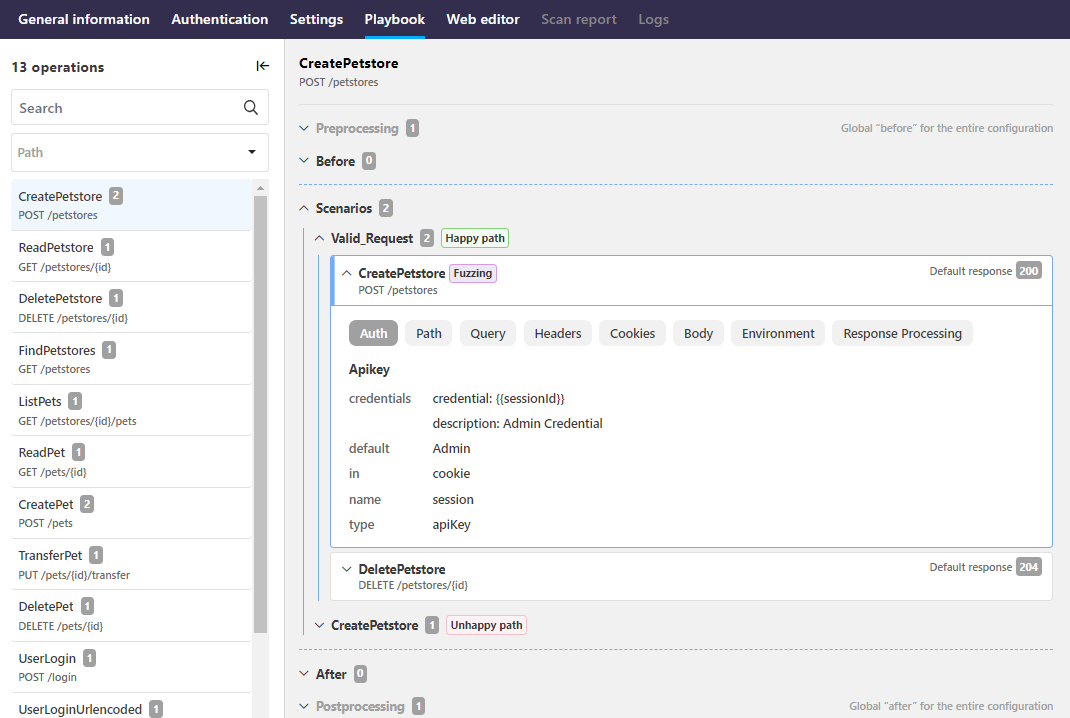
- To change the order of the request, click and choose the direction. You can also change which requests are the ones to be tested for conformance in a conformance scan by switching Fuzzing on or off.
Unlike a conformance scan, a drift scan is non-invasive, so fuzzing is off by default and on purpose.
- To change how the existing requests in a particular scenario work, such as creating variables or assigning different values to them, click on the request, and edit the available details.
- To add more requests to the scenario, click Add request, and select the operation or external request you want. The request is added at the end of the existing scenario, but you can move its position as required and edit its details like with any request.
- When ready, click Save changes.
The changes you apply only in the scope of this particular scenario the next time you run API Scan using this scan configuration.
If your API changes (for example, you add a new operation), the scan configuration for the API is not automatically updated. To include the changes in the scan configuration, you must create a new configuration. If you have multiple scan configurations for different purposes where you need to include the changes, you can just copy the change you need from the new configuration and paste it into your existing ones.
Add external requests
Requests in a scenario usually target other operations defined in your API definition, but they can also be target external systems, for example, to fetch an authentication token or other data required for executing the scenario. For this, you can add external requests to your scan configuration and use them in your scenarios.
- On the scan configuration, go to the Operations tab. You can see the requests to all operations defined in your API.
- To define a new external request, click Add, fill in the details for your request, and click Add external request. Your request is added to the list of available operations, and you can edit further details on it, like for any request.
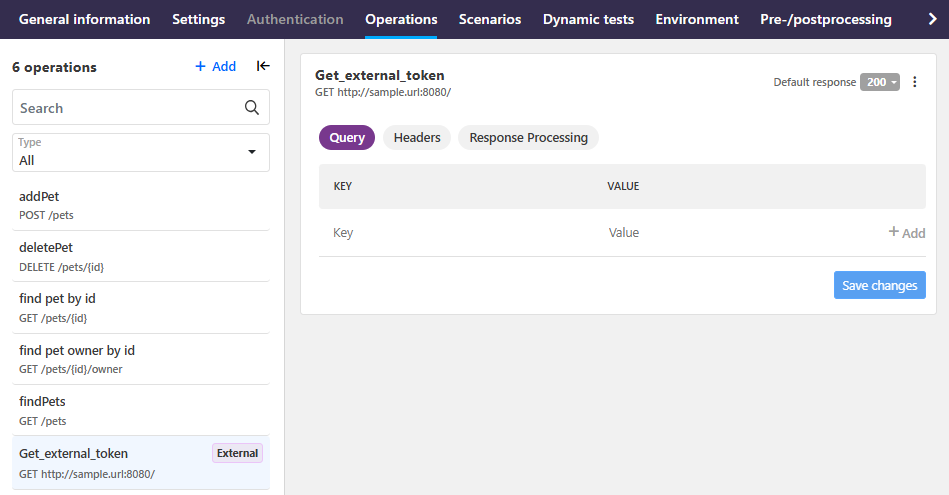
- To use your request in a scenario, add it as a request to the scenario you want.
- When ready, click Save changes.
Add multiple scenarios for an API operation
Scenarios in a scan configuration are organized by API operation and by default every API operation already has a happy path test scenario for them. If you need more happy path scenarios to test multiple HTTP codes for success or unhappy path scenarios to test error codes, you can manually add as many scenarios as you need. Currently, you must do so by editing the scan configuration in JSON format.
- On the scan configuration, go to the Web editor tab.
You can see the scenarios that already exist for each API operation, identified by the
operationId(if available) or the path and method (verb) of the operation. - Find the API operation you want, and add a new scenario in the
scenariosarray. You can copy an existing scenario as the starting point. - Depending on what kind of scenario you are adding, make sure that the field
keymatches the type of the scenario you want:- For happy path scenario
key: happy.path - For unhappy path scenario
key: unhappy.path - For a custom scenario the
keycan be a customstring
- For happy path scenario
- When you are ready, click Save changes.
The scan configuration for the API operation in question now also includes the scenario you added and you can edit it like any of the default scenarios.
For more details on scan scenarios and their structure, see Scan scenarios
Add authorization tests to a scan scenario
Authorization tests let you check how your OpenAPI implementation handles BOLA/IDOR (Broken Object Level Authorization, also known as Insecure Direct Object Reference) attack or BFLA (Broken Function Level Authorization).
- On the scan configuration, go to the Authentication tab. You can see all security schemes defined in your OpenAPI definition.
If you need to test with a security scheme not defined in your OpenAPI definition, you can click Add to add the new security scheme only in your scan configuration, without the need to touch your API definition.
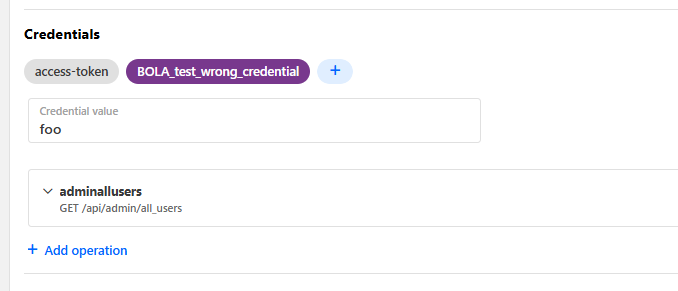
- Click the security scheme you want, and click + to add a new credential that you want to use to replace the correct one in the authorization tests.
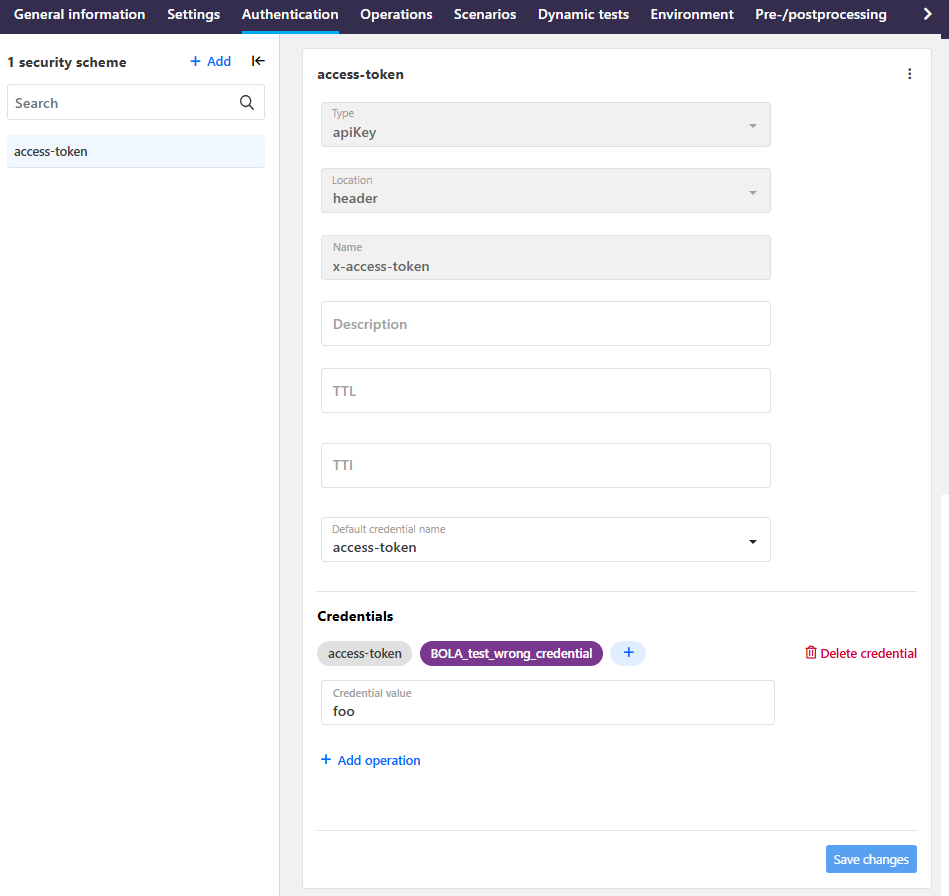
- To associate the credential you created for the test with operations where you want to test for BOLA or BFLA, click Add operation and select the operation or request you want.
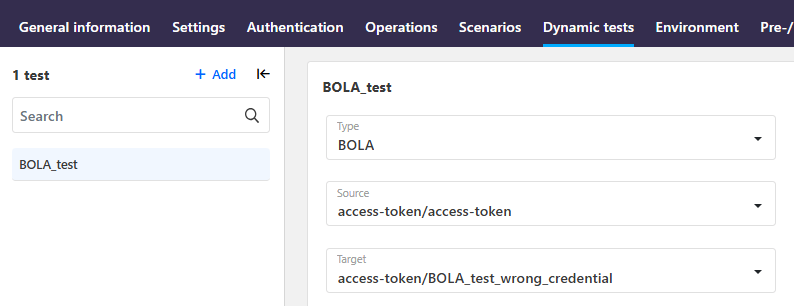
- Go to the Identity tests tab, click Add, give your test a name and select if it is a BOLA or BFLA test.
- Select the credentials to be used in the authorization test and when ready, click Add authorization test:
- Source: The correct credential that grants access to the resource
- Target: The wrong credential that is not supposed to give access to the resource
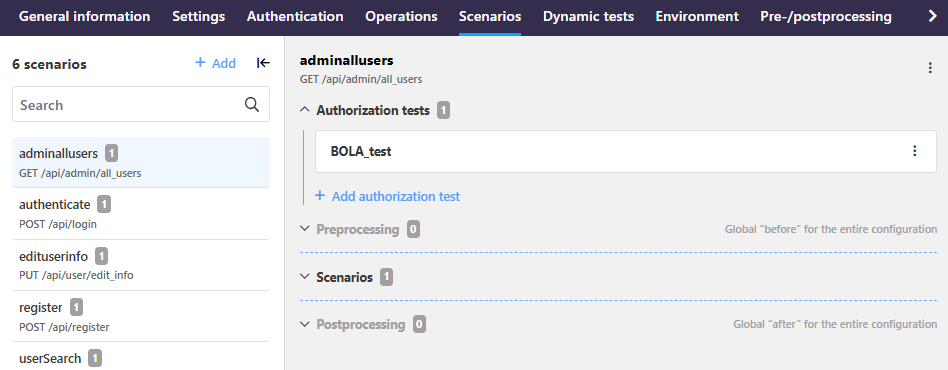
- To use the authorization test in a scenario, go to the scenario, click on Authorization tests > Add authorization test, and select the authorization test you want.
- When ready, click Save changes.
Next time you run scan using your scan configuration, API Scan runs the authorization tests on the operations associated with the test credentials as the first thing in a scan, before it proceeds with the rest of the scan configuration.
Add preprocessing and postprocessing for the whole scan configuration
Sometimes same resources are needed across multiple operations in a scan, for example, the Petstore API would require an instance of a pet store for most tests. Global preprocessing and postprocessing scenarios let you define such overarching flows only once instead of doing this over and over again in each scenario.
- On the scan configuration, go to the Pre-postprocessing tab. Click on the preprocessing or postprocessing section to open the section for viewing.
- To add a new request to the flow, click Add operation and select the request you want. Just like with scenarios in the scan configuration, you can then edit the details of the request as needed and change the order of the requests in the flow.
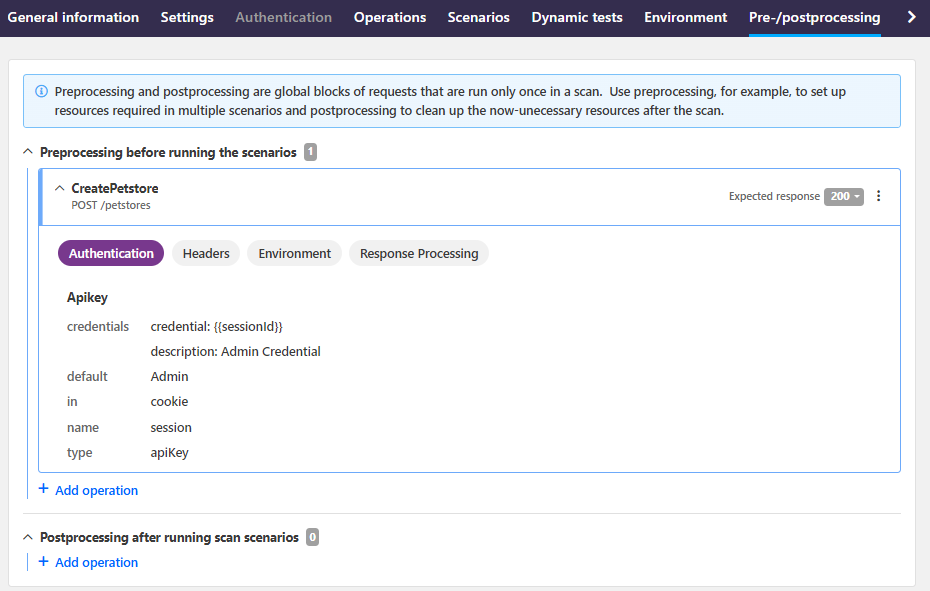
- To use your request in a scenario, add it as a request to the scenario you want.
Mark a scan configuration for multiple scan types
By default, each scan configuration is of only one type (conformance scan, drift scan) when it is created, and in most cases this is enough. However, if you edit your scan configuration so that it starts to combine features for more than one scan (for example, if you combine fuzzing into a drift scan that would normally be non-invasive), you can assign more than one scan type for your scan configuration.
- On the scan configuration, go to the General information tab.
- Click Assign scan type, and select the scan type you want.
Export and import scan configurations
While you can edit the scan configuration in 42Crunch Platform, sometimes you might want to edit the configuration as JSON in the editor of your choice. In this case, you can export the configuration from 42Crunch Platform for editing and then import it back once you are ready.
We recommend always starting with an automatically generated scan configuration for the API in question, to be sure that the configuration that you are starting from is valid for that API. Do not try to export a scan configuration for one API and use it for a different one.
- Go to the API you want, click API Scan, and find the Scan v2 configuration you want.
- To export the scan configuration as a JSON file, click > Download. You can now open the file in an external editor and edit as needed.
Currently, if you export a Scan v2 configuration from the platform, the credentials are exported in plaintext. This will be fixed in a future release.
- To import the scan configuration back into 42Crunch Platform, go to API Scan, and do one of the following:
- OpenAPI definition or GraphQL API: If you want to replace the contents of a scan configuration already in 42Crunch Platform, click > Upload on the scan configuration you want to replace, and select the JSON file to upload.
- OpenAPI definition only: If you want to import the edited scan configuration as a new scan configuration, click Add configuration > Version 2, give the configuration a new name, select Custom configuration in a JSON file in the dropdown, and select the JSON file to upload.
If you use the same name that an existing Scan v2 configuration has, your new scan configuration will replace the existing one.
The JSON file is uploaded to 42Crunch Platform and API Scan validates the scan configuration against the API definition of the API. If the configuration does not match the contract set out in the API definition, API Scan flags the found errors in the SCVR. You must resolve the errors before the configuration can be used in a scan.
Delete scan configurations
You can delete scan configurations you no longer need from 42Crunch Platform.
Deleting a scan configuration permanently removes it from 42Crunch Platform. This action cannot be undone.
- Go to the API you want, click API Scan, and find the Scan v2 configuration you want.
- Click > Delete.
The scan configuration is deleted and can no longer be used to run API Scan. If you had created, for example, Docker scripts to run API Scan, you must updated those to use a different scan token and scan configuration, otherwise they will fail. The latest scan report for the configuration is also deleted together with the configuration.