Scan configuration details
Scan configuration is a JSON file that tells API Scan what it is supposed to do, such as:
- What API to scan?
- Which endpoint to send the requests to?
- How to authenticate to the API, if that is required?
- What kind of tests and what type of scan to run?
You can quickly create a basic scan configuration in 42Crunch Platform by providing some basic information. You can then edit the scan configuration and iterate on it to add advanced features and more complex scenarios. You can also export a scan configuration as a JSON file to work on it outside the platform in an editor of your choice and upload the finished configuration to the platform.
The details that a scan configuration can capture depend on which scan engine (Scan v1 or Scan v2) the configuration is for and does the API in question have an OpenAPI or GraphQL definition. For GraphQL APIs, some configuration tabs are not yet available but the details can be configured on the web editor tab of the configuration, unless otherwise mentioned.
Scan configurations and tokens are specific to a scan version: you cannot run Scan v2 engine using a Scan v1 scan token, and vice versa. You also cannot run a scan on a GraphQL API with a token for an OpenAPI scan configuration. When running a scan, make sure you specify the right scan token for the API and the scan version you are using, otherwise API Scan cannot use the associated scan configuration and fails to run.
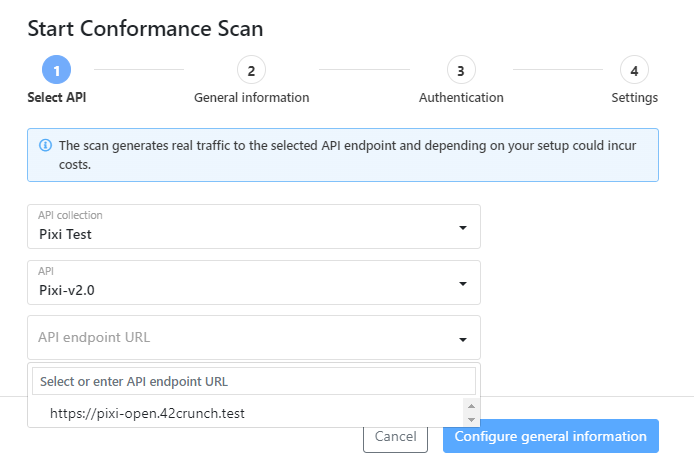
API endpoints
API endpoint is the URL where the scan will send its requests.
For OpenAPI definitions, API Scan lists endpoint URLs that are parsed directly from your API definition. However, if you want to use a URL that is not listed, you can also enter it when you configure the scan settings for Scan v1 or edit the environment variables for Scan v2.
If you want to override the API endpoint defined in your API definition and scan a different endpoint, make sure you specify a valid host for the paths in your API definition. For example, if your API follows OAS v2 and uses a basePath, make sure you include the basePath in the URL you enter, otherwise the basePath is ignored in the scan configuration.
The URL you enter for the API endpoint must fulfill the following criteria:
- It is a public URL.
- It specifies either
httporhttps(for example,http://127.6.0.1:8000orhttps://api.example.com/v2). - It is not an internal address (for example,
http://localhostor255.255.255.255). - It does not include parameters (for example,
http://www.example.com/products?id=1&page=2). - It does not include anchors (for example,
http://www.example.com#up).
For GraphQL APIs, you must always manually fill in the URL because this information is not captured in the GraphQL schema definition file.
Authentication
If your API or its operations are protected with authentication, API Scan must provide the required details to authenticate when it sends requests to the API. You must therefore configure the authentication details that you want to use in the scan.
How the authentication details are provided to API Scan is different for OpenAPI definitions and GraphQL APIs.
Authentication for OpenAPI definitions
API Scan currently supports the following authentication types:
- Basic authentication
- API keys in headers, query strings, or cookies
- Bearer token
- OAuth 2
- OpenID Connect (OAS v3 only)
- Mutual TLS (mTLS) for client authentication, the client certificate must be in
pkcs12format
To configure OAuth2 authentication, you must first manually obtain an access token that API Scan can use to authenticate to your API. In the scan configuration wizard, authentication with OAuth token is configured like bearer token. For more details on OAuth2, see RFC 6749.
For more details, see Scan APIs.
When generating a scan configuration for OpenAPI definitions, it automatically includes the authentication details, because they are described as part of the API definition itself. The configuration wizard shows all security schemes defined in the OpenAPI definition of your API.
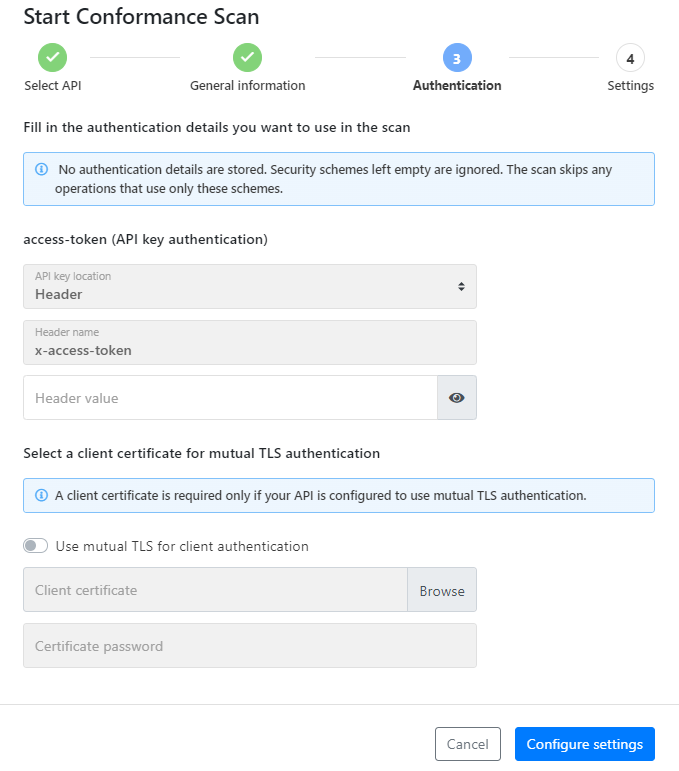
- For Scan v1, you can fill in the details only for the security schemes you want to use in the scan. You can leave the security schemes that you do not want to use in the scan empty and API Scan will ignore these schemes. Any API operations that use only these security schemes for authentication are skipped in the scan.
- For Scan v2 , by default you must fill in credentials to all authentication methods all security schemes defined in your API, or the scan will not run properly. If you have defined an authentication method in your OpenAPI definition but your API does not actually use it, afteryou have created the scan configuration you can mark the authentication method as not required at runtime. Credentials can also be created dynamically in a particular scenario by defining a request for it.
If you run Scan v1 engine in 42Crunch Platform, the authentication details are only used in the current scan and are not stored anywhere. For Scan v1 on premises and Scan v2, the authentication details are stored encrypted as part of the scan configuration in the platform. The authentication details are not retrievable and credentials are hidden.
If running the engine on premises, instead of hard-coding the authentication details in the scan configuration, you can use environment variables. See Using environment variables with Scan v1 engine.
Authentication for GraphQL APIs
For GraphQL APIs, API Scan currently supports authentication with API key in header.
Unlike OpenAPI definitions, GraphQL APIs do not document what kind of authentication (if any) they are protected with. Instead, the authentication is completely externalized to the host server and business logic. Of course, for API consumers — including API Scan — this still means that they must be able to satisfy the authentication requirements before they can access the GraphQL API.
Because the authentication details are not available by default, they cannot be automatically populated into the scan configuration and so each scan configuration for a GraphQL API starts without any authentication information. If your API requires authentication, you must go and edit the scan configuration to include the required authentication details. This results in your scan configuration having security schemes for your selected authentication methods the same way as is done for OpenAPI definitions. API Scan then automatically puts the authentication details in a header that is included in the scan requests it sends.
With OpenAPI definitions, absence of security requirements can be inferred to mean that no authentication is needed. However, GraphQL API definitions are ambiguous in this respect because the information would not be there regardless. Therefore, if your GraphQL API or some operations in it do not require authentication, you can include a dedicated security scheme that explicitly declares this.
Settings
When you create a scan configuration for running API Scan, there are various settings that you can choose to configure. Configuring these settings is entirely optional and not needed in most cases, the default settings that API Scan uses are usually enough. However, for more advanced use, the settings let you tweak some aspects of the scan, such as memory limits.
The available settings may vary depending on are you running Scan v1 or Scan v2 engine and in 42Crunch Platform or on premises. When running a Scan v2 in the platform, some settings are capped on a lower level than when running the same configuration on premises.
For the full list of available settings, see API Scan settings. Because OpenAPI definitions and GraphQL APIs both use the same Scan v2 engine, same settings apply to both types of APIs.
Some scan settings, such as maximum size of the scan report, have an absolute maximum value that you cannot exceed. If you try, your scan might fail or you might not get a scan report. You can check what these values are on your 42Crunch Platform environment, see Check your platform URL
Scan scenarios
This applies to Scan v2 engine only.
Scan scenarios allow you to configure chains of requests and responses that depend on each other for testing a particular scenario. You can, for example:
- Tailor the tests and their input that API Scan executes to suit your particular needs
- Define complex happy path tests (scenarios chaining multiple API calls)
- Define unhappy path tests to establish the expected baseline for error codes
- Create and retrieve credentials dynamically when they are needed
- Define identity tests, such as testing how your API implementation handles BOLA/IDOR (Broken Object Level Authorization, also known as Insecure Direct Object Reference) attack or BFLA (Broken Function Level Authorization).
- Ensure that resources needed for testing a particular API operation get created or deleted as required.
The Scenarios tab of a scan configuration compiles all defined scan scenarios together for easy reference and reuse.
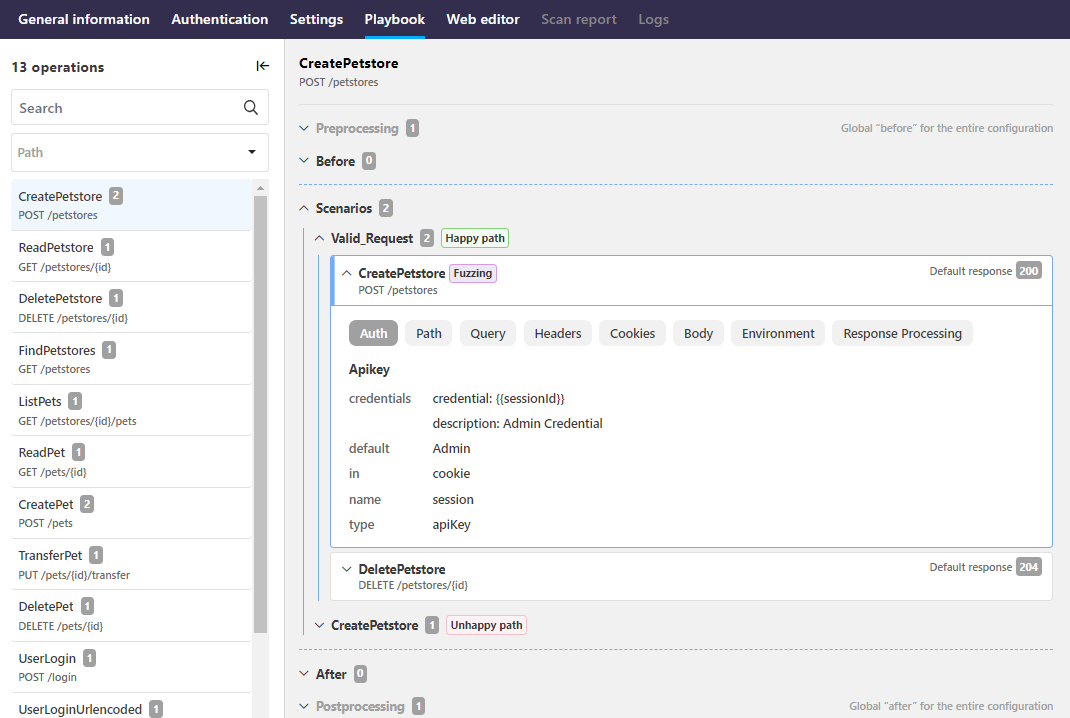
The basic scan configuration that is generated based on the API definition of your API already includes a scenario that API Scan executes for each API, but if needed, you can define as many additional scenarios in the configuration as needed.
In the scan configuration, scenarios are defined per operation, each identified by the operationId (if available) or the path and method (verb) of the "parent" operation. Because the latter can lead to very long and complicated names, we recommend to define an operationId for each API operation in your API definition.
Tests and requests in a scenario
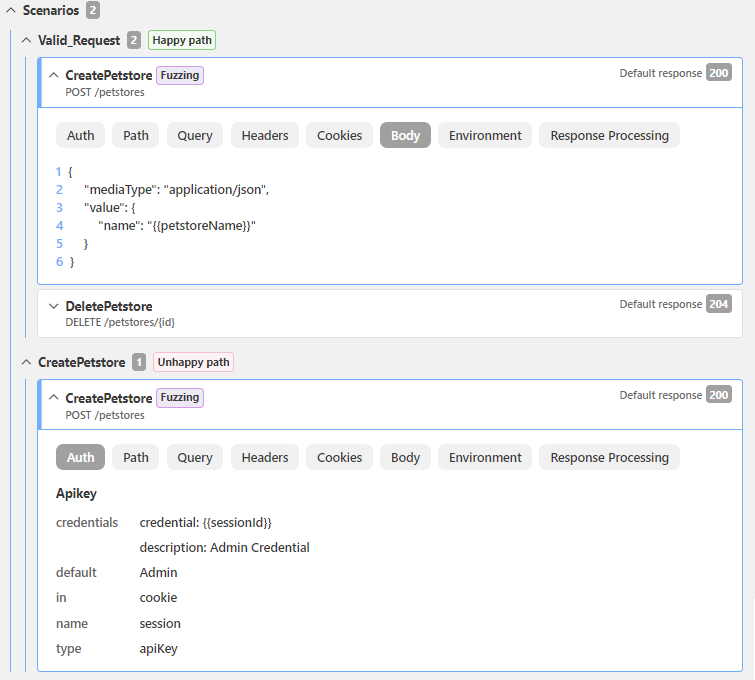
Because API Scan always needs to know what the expected result looks like, scenarios for a particular API operation must include at least one happy path test for each scenario to provide a baseline for successful API responses, typically HTTP 2XX. If you want to test all your defined response codes for success and not just the first one that your API happens to respond with, you can add separate happy path tests for each code you want (for example, HTTP 200, 202, and 206).
In addition, you can also define one or more unhappy path tests to provide a baseline for API responses for errors, typically HTTP 4XX. Like with happy path tests, defining multiple unhappy path tests for different error codes lets you ensure that all your combinations (for example, HTTP 400, 404, and 418) are tested.
Currently, if you want to combine multiple scenarios into one flow, you must do so by editing the scan configuration in JSON format. Once added, the additional scenarios can be edited on the UI like the automatically generated ones.
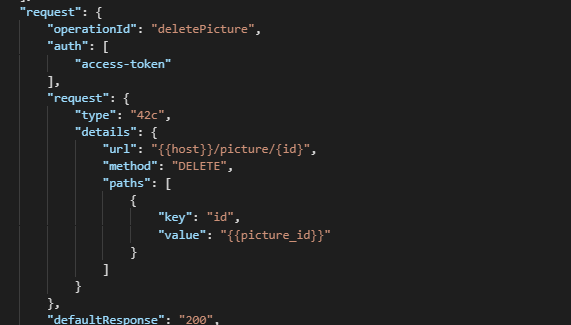
What exactly happens in each scenario is defined as a chain of one or more API requests that API Scan executes to test a particular API operation. The default scan configuration automatically includes a request for every operation defined in your API definition, listed on the Operations tab and also shown in the raw JSON scan configuration. Requests can target other operations defined in your API definition or they can be completely external to it, for example, to fetch an authentication token or other data required in to execute the scenario.
The label fuzzing indicates which operations are to be tested for conformance to the API contract when running a conformance scan and which are simply supporting requests for these operations. If conformance tests are required in the scenario, at least one happy path test for an API operation must be marked for fuzzing in the scenario.
You can edit the details of any request, such as body, headers, or environment variables associated with it, and you can delete external requests that you no longer need. You cannot delete the requests for your API operations, to ensure that API Scan continues to be able to scan your API.
Order in scenarios
At its simplest, the order in the scenarios is the order in which the requests are listed: when executing the scenario, the scan sends the requests one by one until it reaches the end of the scenario. You can include as many requests into your scenarios as needed and change their order.
If you need specific resources to be in place before a specific test can run, you can include requests for them in your scenario and place them before the operation that is the focus of your testing. If you need to remove resources that are no longer needed, you can define requests for this and add them at the end of your scenario. API Scan runs all requests in a scenario for each test in the scan, both for happy path tests and the actual tests. For example, if you have defined a test scenario that attempts to create a new resource through an injection and that injection works (HTTP 200 OK), the defined clean-up requests that return the data to a clean state are also always executed.
However, some resources might be needed across multiple operations in a scan. For example, the Petstore API would require an instance of a pet store for most tests, so it might make sense to create it at the very beginning of a scan and remove it at only the end instead of doing this over and over again. In this case, you could define these request as a preprocessing block that is executed only once before API Scan starts testing your API. If preprocessing fails for some reason, the scan stops before running any tests.
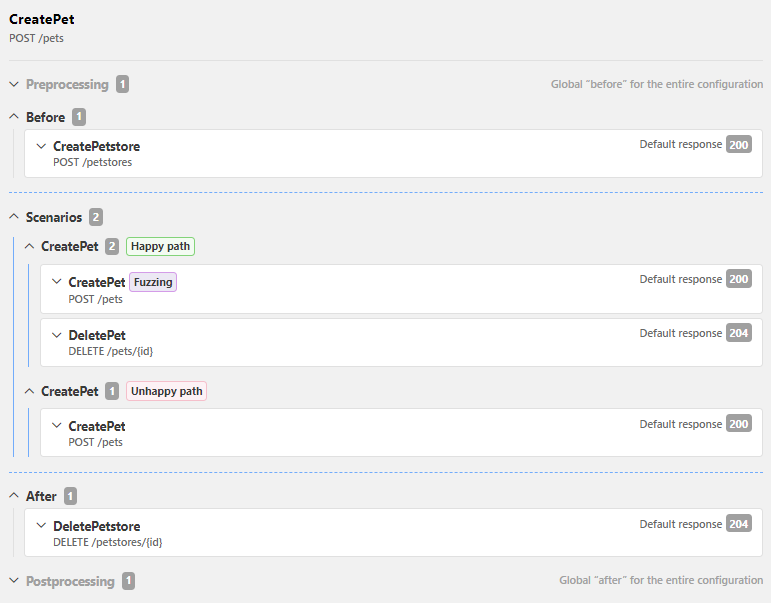
Similarly, you could also define the cleaning up of the created resources, like the pet store here, as a postprocessing block that is executed only after the scan has finished testing your API. This would reduce the number of requests in the scan, but it also means that the data would not be returned back to clean state until after the API is scanned, so you might need to take this into account for some tests, especially if you wanted to test the behavior when the required resource does not exist. In this case, you could either define additional requests to remove the resource in these test scenarios, or you could even create a separate scan configuration for testing these scenarios.
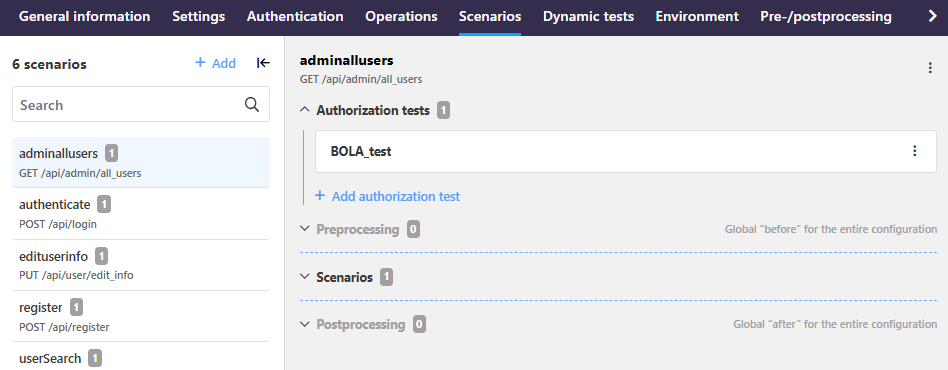
Identity tests
This applies to Scan v2 engine only.
Identity tests are advanced tests, such as BOLA and BFLA tests, that check that your API implementation handles authorization properly. You define the credential that is not supposed to give access to a particular resource (source) and the correct credential that it replaces (target). You can then add your test to the authorization tests on any scenario in the scan configuration where you want to include it. As their place in the scan scenario structure implies, API Scan runs the authorization tests once as the first thing in a scan, before it proceeds with the rest of the scan configuration.
Scan variables and environments
This applies to Scan v2 engine only.
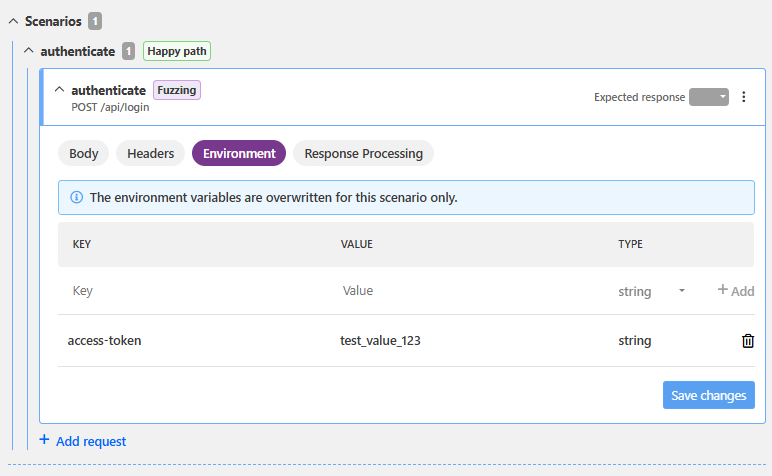
API Scan uses variables ({{variable_name}}) to pass information across different blocks of the scan configuration, for example, to setup a credential or fill in parameters and request body properties. This could happen either from one stage of a scenario to another, between different scenarios, or even between different deployment environments.
Scan variables can be divided into two groups, depending on where they are defined:
-
Global variables:
Variables defined on a global level in the scan configuration have a broader scope. They can be accessed from and used in all requests and tests in any scenario in the scan configuration because API Scan creates these variables at the beginning of the scan, making the variables available globally throughout the testing process.
- Scenario-level variables:
These variables are created in and specific to a particular scenario, meaning that they are used exclusively within the scope of that scenario.
Populating variable values
The easiest way to create variables and assign values to them is by defining the variables directly as part of the scan configuration. This lets the API Scan take different values depending on the environment of the scan, such as where the API is deployed. For example, you might have an API that is live in both your development and testing environments and the required host or authentication details are different. In this case, you could simply edit the scan configuration to add another set of environment variables that are used when running the scan in the other environment.
This way you can reuse the same configuration without having to recreate the parts that stay in common. Scan configuration always includes definitions for at least one environment, but you can expand the configuration as needed.
However, sometimes predefined variables are not enough. Because API Scan tests the full API implementation, the chains of requests and their dependencies become crucial. Testing an API operation might require prerequisite calls so that all necessary resources exist in the first place, and the API responses to these calls must pass the details, such as UUIDs, of these resources to make them available to downstream operations. In this case, you can add creating the variables and their values as part of the response processing on a particular request and use that variable in subsequent calls.
Dynamic variables when there is no schema
Previously when running a conformance scan, API Scan used the dynamic variable $random to generate values it uses for testing. However, $random always requires a schema to provide the details of the kind of value it should create and if schema is not available, API Scan fails to generate a value it can use in tests.
In Scan v2 engine, there are now more dynamic scan variables you can leverage to generate random values:
- From schema: The variable
$randomFromSchemacorresponds to the previous$randomand generates the values based on the schemas defined in your OpenAPI definition. Like$random, it requires that a schema has been defined for input that the API operation to be tested needs. The schema can provide examples of values in which case the provided examples are used as before. Because API Scan must be able to find the schema used as the basis for value creation,$randomFromSchemacan only be used in requests that are tied to an API operation throughoperationID, so that API Scan can link it with the corresponding operation in the OpenAPI definition - From defined type: If there is no schema that could be used as the basis for the dynamic variable, you can indicate what kind of value the scan should generate directly in your scan configuration by using type-specific dynamic variable. In this case, API Scan generates a suitable value for the dynamic variable based on the definition of the corresponding type in JSON Schema specification. The generated values follow their predefined default properties in all cases and therefore should only be used when there is no schema available. Otherwise, API Scan would ignore the constraints defined the schema in favor of dynamic variable and value and therefore the sent request would at no point conform to the API contract. The following dynamic variables are available:
Variable Description Example {{$randomString}}Generates a random alphanumeric ( [a-zA-Z0-9]) string of 20 charactersOacDH8y56XSzi12sQ9qB{{$randomuint}}Generates a random uint32integer138462387{{$timestamp}}Generates the current time in UNIX format 1695900968{{$timestamp3339}}Generates the current date and time as defined in RFC 3339 2023-09-28T11:40:55+00:00{{$uuid}}Generates a unique UUID 3e4666bf-d5e5-4aa7-b8ce-cefe41c7568a
For example, in your scan configuration you might define a stand-alone request to send a name:
"requestBody": {
     "mode": "json",
     "json": {
         "name": "OIXS zisQ9qB\f"
    }
}
If you hard-code the values in the scan configuration, the same values are used in all requests, which could cause problem when the same value cannot be used twice. Instead, because there is no API operation to provide a schema on how the value should look like, you could use $randomString as a scan variable instead of hard-coding the values to create a different value each time the request is run:
"requestBody": {
     "mode": "json",
     "json": {
         "name": "{{$randomString}}"
    }
}
However, better results are often achieved if there is an API operation that could be leveraged to use $randomFromSchema:
"request": {
    "operationId": "editUserInfo",
    ...
    "requestBody": {
        "mode": "json",
        "json": {
            "pass": "{{$randomFromSchema}}",
            "user": "{{$randomFromSchema}}"
        }
    }
}
In this case, API Scan would check the schema definition from the API operation editUserInfo and use the properties from that schema when populating the values.
What is...
How to...
Learn more...