Integrate 42Crunch Platform with Visual Studio Code
To integrate your IDE with 42Crunch Platform, you must first install the extension OpenAPI (Swagger) Editor to your IDE. After that, you can choose either the free but limited experience, or the full experience for paying customers.
- Paying customers use IDE tokens to configure the IDE extension to access and authenticate to 42Crunch Platform. You can create IDE tokens in 42Crunch Platform, either on the landing page or in your platform account settings. This documentation describes usage for paying customers.
- Free customers can use freemium tokens in their IDEs to configure using the more limited freemium service locally. For more details on the freemium service, see Freemium User FAQ.
For more details on VS Code integration, see VS Code integration.
You can also find a tutorial video on OpenAPI (Swagger) Editor in VS Code here.
Create an IDE token
The extension uses a token to authenticate to 42Crunch Platform, so on the first time, you must provide one that the extension can use. If you already have an account in 42Crunch Platform or want to create one, you can create an IDE token and use that one.
- Log in or sign up to 42Crunch Platform.
- Click Create a new IDE token on the landing page.
- Copy the value of your IDE token and store it securely, you will need it to configure your IDE extension.
Update your token
If you want to use a new IDE token — or change to using IDE tokens to unlock more integration features — you can reconfigure the token that the IDE extension uses.
- Create an IDE token, and remember to copy the token value and store it securely before closing the configuration window. For security reasons you cannot view the token value later.
- In VS Code, open the command palette, and select the command 42Crunch: Update platform credentials.
You can also open the extension settings by clicking the 42C icon at the bottom of the editor.
- Enter the URL your organization uses to access 42Crunch Platform. For most users, this is
https://us.42crunch.cloud. If you are not sure what your platform URL is, contact our support. - Enter the value of the new IDE token.
Your IDE will now use the new token to authenticate to 42Crunch Platform.
Configure VS Code and audit your API definition
You can find OpenAPI (Swagger) Editor on the VS Code Marketplace.
- Install OpenAPI (Swagger) Editor extension to your VS Code editor.
- Open the API you want in VS Code in
.jsonor.yamlformat. - To run Security Audit from VS Code, click the OpenAPI: API Audit button at the top edge of the editor.
On the first time, you must provide a token that the extension can use to authenticate to 42Crunch Platform. If you have created an IDE token, click I have an existing account, and enter the token value you copied and the URL your organization uses to access 42Crunch Platform. For most users, this is
https://us.42crunch.cloud. If you are not sure what your platform URL is, contact our support. Configuring the token is done only once, on subsequent audits you just click the button.If your network connections must go through a proxy, OpenAPI (Swagger) Editor is not able to connect to 42Crunch Platform and the Test connection button does not work unless you configure your IDE to use the proxy. For more details, see VS Code documentation.
Security Audit checks your API definition and provides audit score and report on the found issues in the editor just like in the platform. The elements containing issues are also marked in your code. For more details, see Audit report in VS Code.
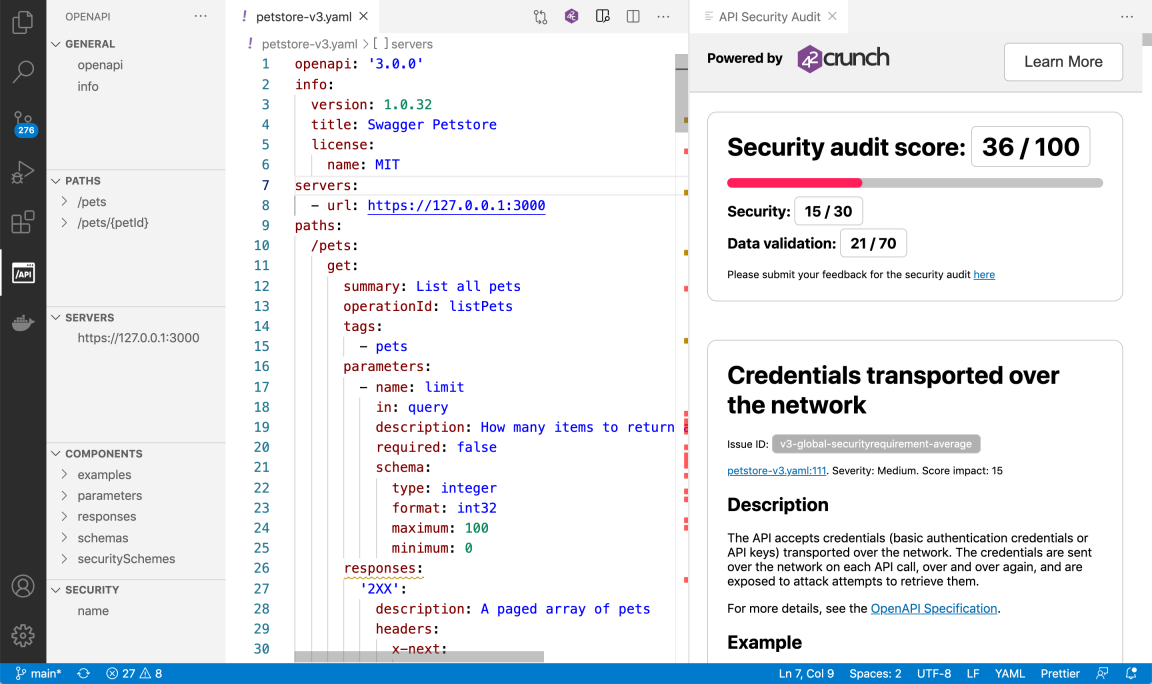
- Click the icons in the status bar to open the Problems panel, scroll through the issue titles, and click on an issue to jump to view it inline in your API definition. The issues are ordered from most to least severe, so it is easy for fix the worst offenders first. Recommendations are not listed in the Problems panel.
- Hover on an element marked in your code to see the list of issues in that spot, and click on the list to filter the text panel to show only these issues.
- Edit your API definition to fix found issues, save your changes, and click the OpenAPI: API Audit button to re-run the audit.
If you want to just test how an API operation works, click Try it on that operation to send a single HTTP request to that operation. You can also tweak the parameters, request body, or settings used for that request.
For more details on how OpenAPI (Swagger) Editor helps in creating and editing OpenAPI definitions, see our VS Code extension repository.
If you use external references to schemas that are served by an HTTP service requiring authentication, you must add the list of approved hosts in the settings of the IDE extension. See Configure authentication for external references in OpenAPI files.
Use API Scan in VS Code
OpenAPI (Swagger) Editor also lets you scan your API operations and work on your scan configuration directly in your IDE.
The scan generates real traffic to the selected API endpoint and could incur costs depending on your setup.
For best results, make sure that your OpenAPI definition is valid and well-formatted before you scan it. The API must be deployed so that the API endpoint is live, and the backend server your API uses must be accessible to API Scan. Otherwise the API cannot be scanned.
API Scan can have potential side effects: APIs can throw exceptions, fail, and data can be affected. As per our terms and conditions, you must only run invasive scans, such as conformance scan and fuzzing requests, against APIs that you own, and only against non-production systems and non-production data! Do not run other scan types except the non-invasive drift scan in production environment!
- Open the API you want in
.jsonor.yamlformat. - Go to the API operation you want to scan, and click Scan. The IDE extension generates a default scan configuration based on your OpenAPI definition and opens that to a new tab. You can see all operations defined in your OpenAPI definition, listed by their
operationId. Clicking on anoperationIdon the list changes the operation in focus.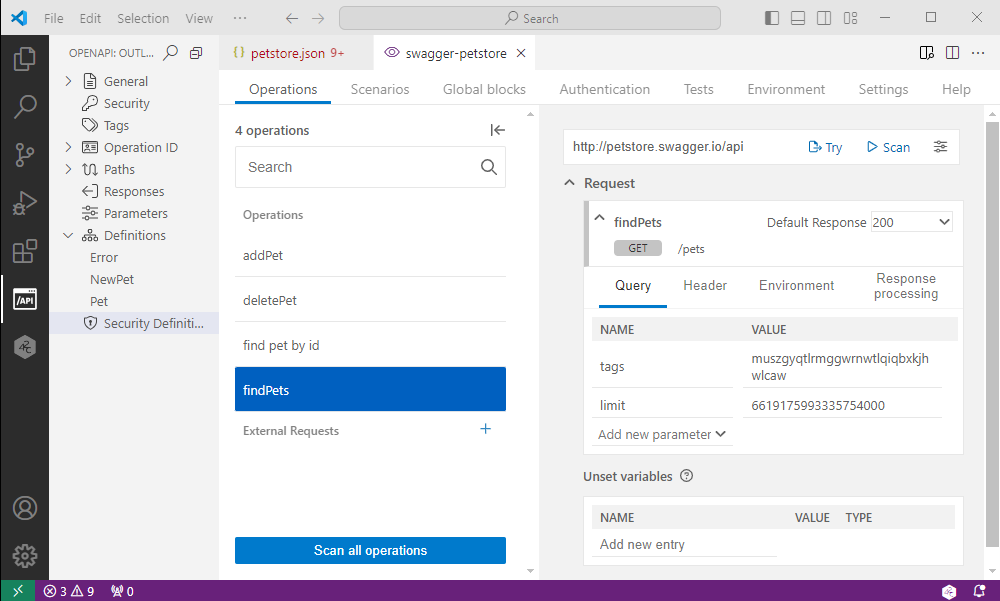
-
If your API uses authentication, by default the scan in the IDE expects all security requirements to be required in any scan you perform and the scan fails unless you specify all
SCAN42C_SECURITY_environment variables for them. However, if you only want to scan a single operation and do not want to specify other security requirements than what the operation in question uses, you can mark the other security requirements as not required, and switch them back to required when you are done.
- If you want, you can also edit the scan configuration. You can, for example:
- Create and edit scenarios, global preprocessing and postprocessing block, or custom tests. For more details, see Scan scenarios.
- Populate environment variables used in your scan configuration with data from external sources, such as secrets.
- Change the scan runtime settings.
Not all scan settings might be available in the IDE.
You can find more information on API Scan directly in your IDE on the Help tab.
- To test that your happy path request for the operation works, click Try. The IDE extension generates and sends the happy path request to the operation and you can see the result underneath the settings on the Operations tab. Clicking lets you change some settings for the request.
- To run a scan, do one of the following on the Operations tab of the scan configuration:
- To scan just a single API operation, click on the
operationIdyou want, and click Scan. API Scan runs the scan only on the selected API operation, using the current scan configuration and settings. - To scan all operations in your API, click Scan all operations. API Scan scans the full API, using the current scan configuration and settings.
In both cases, API Scan provides a report on the found issues in your editor just like it does in 42Crunch Platform, and you can see how the happy path tests went.
- To scan just a single API operation, click on the
- To view results from all tests that the scan run, including the ones where no issues were discovered, click Tests. To view results only from the tests that discovered issues, click Issues found. You can also further filter the results, for example, by the endpoint, test, method, or
operationId. If filtering by severity, issues of the selected level or more severe are shown.
To fix the found issues, you can either change your API definition or API implementation, depending on what is the outcome you want, and then rerun the scan to verify the fix.
Define authentication methods in your IDE
The most common environment variable that you need for your scan configuration are credentials for authentication. If your API uses authentication, by default the scan in the IDE expects all security requirements to be required in any scan you perform and the scan fails unless you specify all SCAN42C_SECURITY_ environment variables for them. When scanning in your IDE, you can define the credentials as secrets in your IDE.
- In the scan configuration in your IDE, go to the Environment tab. You can see all environment variables already defined for your scan configuration, such as all security requirements defined in your API.
- To check which authentication methods you need for the API, check where source environment variables start with
SCAN42C_SECURITY_. These mark the credentials your API requires. - To define secrets to store the credentials in your IDE, click Manage IDE environment, and go to the Secrets tab.
- For each
SCAN42C_SECURITY_variable, click onto an empty line (where it saysname) and enter the full value of source environment variable, then enter the credential value for it. For secrets, the exact value is automatically hidden.
You have now stored the credentials for your API as secrets directly in your IDE. You can also define other environment variables in the same way, if they are not sensitive information, you can define them on the Default tab.
Change the runtime for audits or scans
By default, the IDE extension runs audits by calling 42Crunch Platform and scans by using 42Crunch API Security Testing (AST) binary. You can what the IDE extension uses to run audits and scans from the extension settings.
Change audit runtime
- In your IDE, open the extension settings. The quickest way to do this is to click the 42C icon at the bottom of the editor.
- Click API Audit runtime, and select which runtime option you want to use:
- Platform: Run audit by calling 42Crunch Platform.
- 42Crunch API Security Testing binary: Automatically download the AST binary and run the audit locally on your machine.
Change scan runtime
- In your IDE, open the extension settings. The quickest way to do this is to click the 42C icon at the bottom of the editor.
- Click API Scan runtime, and select which runtime option you want to use:
- 42Crunch API Security Testing binary: Automatically download the AST binary and run the scan locally on your machine.
- Docker: Automatically generate the Docker command and run scan locally on your machine using the standard API Scan v2 Docker images. You must have Docker installed and configured on your machine before you start.
- Scand Manager: Add Scan Jobs Manager into your Kubernetes cluster to run API Scan Docker images remotely as a Kubernetes job (see scand-manager repository).
Using Docker requires Docker installed and configured on your machine. Using Scand manager requires configuring and deploying the Kubernetes job in your Kubernetes cluster.
- If you selected to use Scand manager, under Runtimes click Scand Manager, and enter the host of your scand manager job.
Configure API proxy for the AST binary or Docker
When running audit or scan, OpenAPI (Swagger) Editor must connect to 42Crunch Platform to check that the IDE token is valid, and when running a scan, it must also connect to the live API to be scanned. This is not an issue as long as the machine it runs on has a direct internet access. However, if the access to internet or to the API is behind a proxy, some additional configuration may be needed when using the AST binary or Docker as the scan runtime.
The IDE can auto-detect system level proxies and automatically uses them for connections as required, including when using the IDE extension. For example, when running scan with the AST binary or Docker, the IDE extension passes the relevant ones using the variables HTTPS_PROXY (the connection to 42Crunch Platform) and HTTPS_PROXY_API (the connection to the API to be scanned) as required. However, sometimes auto-detecting proxies might not be enough and you might need to correct the proxy settings.
If you need to change the connection to 42Crunch Platform (HTTPS_PROXY) or the overall proxy behavior, you need to change the proxy settings in your IDE. For more details, see the documentation of your IDE.
If you need to change the proxy to reach the API that you want to scan (HTTPS_PROXY_API), you need to configure this in the scan runtime settings of the OpenAPI (Swagger) Editor extension:
- In your IDE, open the extension settings. The quickest way to do this is to click the 42C icon at the bottom of the editor.
- Click API Scan runtime, and check that the runtime is set to either the AST binary or Docker.
- In API proxy URL, enter the proxy the IDE extension must use to reach the API to be scanned.
The IDE extension now passes the proxy URL you defined in the variable HTTPS_PROXY_API for the connection to the API when running a scan with the AST binary or Docker. Testing an API operation with the Try it function also uses this proxy.
Because Scan Jobs Manager (Scand Manager) is run remotely, the proxy settings on your local machine do not affect it in any way.
Generate API definitions with API Contract Generator
API Contract Generator avoids having to start from scratch and manually defining a whole OpenAPI definition. If you have an existing API implementation but no OpenAPI definition for it, you can use API Contract Generator to automatically generate one for it.
- Click the 42C icon on the activity bar, and click Generate. API Contract Generator opens.
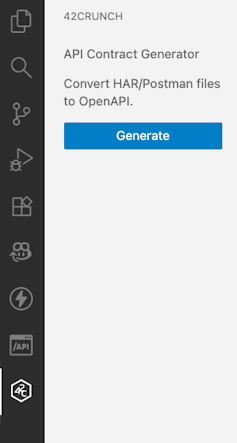
- Click Select Postman or HAR files, and select one or more files to use as input for the OpenAPI definition.
- To include more input files, click Add more files, and select the files you want. You can select up to 10 HAR files or Postman collections as JSON files, or the combination of both. The combined file size must be under 250 MB.
If you are using environment variables in your Postman collections, you can export them from Postman and include in the resulting environment variable file as input for API Contract Generator. Only one environment variable file can be used for each generated API. For more details about environment variables in Postman and how to export them, see the Postman documentation.
- If you accidentally add a wrong file in the input, hover on the file you want to remove and click > Delete.
- By default, API Contract Generator uses sample values for the base path and server URLs. You can change the values to the ones you want to use already before you generate the API definition, or you can update them later in the generated OpenAPI definition.
- When ready, click Generate.
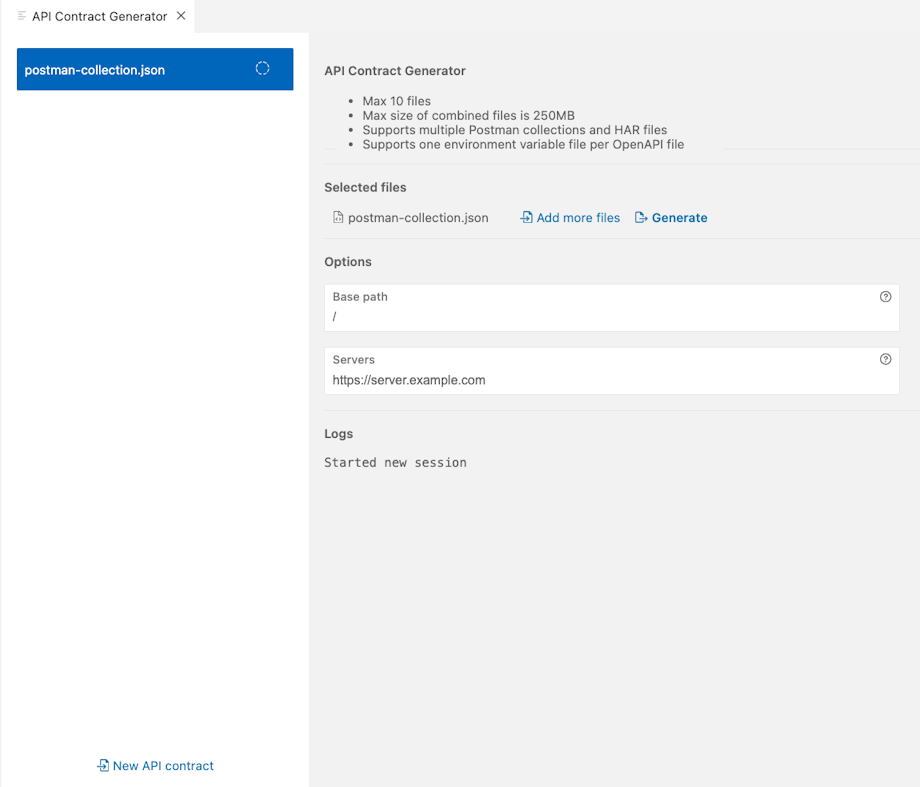
- Save the generated file to the location you want.
To immediately continue to work on the saved file, click the file name to open it in your IDE.
API Contract Generator uses all the input files you selected to build a single OpenAPI definition. If you want to create another API definition, just click New API contract.
API Contract Generator generates a new OpenAPI definition on every run, it cannot be used to modify existing API definitions. If you find that you forgot to include some input files, just start again, this time including all the necessary files, and simply replace the previously generated API definition when saving.
Use security quality gates and customization rules in IDE
Security quality gates (SQGs) set quality criteria in audits and scans that API definitions must pass in 42Crunch Platform, while audit rules provide directives how Security Audit is run. Tags are the mechanism to apply these to your APIs in 42Crunch Platform. To get the same experience when auditing or scanning APIs in your IDE as when doing so in 42Crunch Platform, you must associate the required tags from 42Crunch Platform to APIs locally in your IDE.
Default SQG and audit rule defined in your organization are applied automatically whenever you audit APIs in your IDE. Currently, scan rules defined in 42Crunch Platform are not supported in IDEs.
- Open the API you want in
.jsonor.yamlformat. - At the top of the API definition, click Tags.
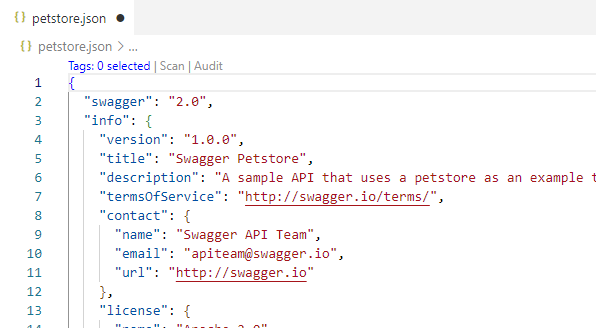
- On the Tag selection tab, choose one of the following ways to associate tags with your API:
- If you are working on an API that already exist in 42Crunch Platform and that has the correct tags applied, you can link the API you have locally in your IDE with the API in the platform. Select Link to API, and then select the API collection and the API that you want to link with. All tags from that API are associated with the API definition in your IDE.
- If you are working on an API that is not yet in 42Crunch Platform, you can select which tags to associate with the API locally in your IDE. Select Tags, and then select the tag categories and tags that you want to associate to your API.
Associating tags to APIs is only local to your IDE and does not have any effect in tags on APIs in 42Crunch Platform. If you link with an API already in 42Crunch Platform, the audits or scans you run in your IDE have no effect on the API in the platform, nor are the reports stored in the platform.
- Rerun audit or scan on your API. The SQGs and audit rules applied to the linked API or associated with the selected tags are now taken into account also in the IDE.
Apply mandatory tags in the IDE
Your organization may have designated certain tag categories to be mandatory, meaning that all APIs in your organization on 42Crunch Platform must have a tag from those categories applied to them.
If an AP is missing tags from categories defined mandatory, it is not considered to be structurally valid because it is lacking a mandatory property and the audit raises an issue on this. Because tags could apply directives that change the audit results, no other issues are raised before the mandatory tags are applied.
In addition to tagging APIs in the platform, you can apply mandatory tags to APIs already in your IDE.
- In your IDE, open the extension settings. The quickest way to do this is to click the 42C icon at the bottom of the editor.
- Click Mandatory Tags.
- Enter the tags that you want to apply to APIs directly in your IDE. You must list the tags in the format
category:tag. For example, if you want to apply the tagfoofrom the categorybar, you must type inbar:foo.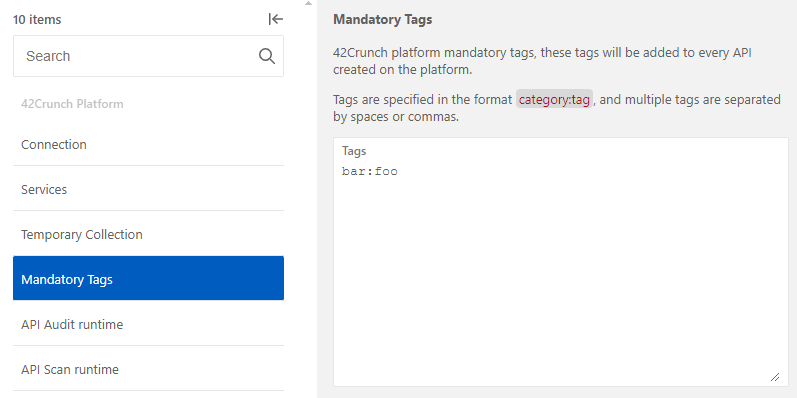
The mandatory tags that you listed are now taken into account when you run audit or scan in your IDE. If you have listed tags from all tag categories defined as mandatory in your organization, the structural error on missing mandatory categories is no longer raised in the audit.
If you import an API using the collection viewer in the IDE, all mandatory tags you listed are automatically applied to the API when it is imported to 42Crunch Platform.
View API collections in the IDE
You can also view and manage API collections available to you in 42Crunch Platform directly in the IDE.
- To view the API collections available to you in 42Crunch Platform and APIs in them, click the Collections icon on the activity bar.
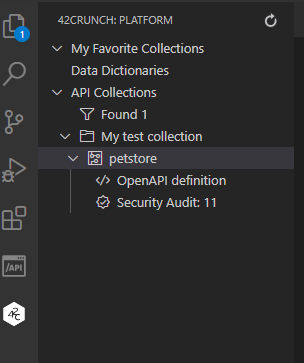
- To open the API definition in the IDE, click OpenAPI definition. To view the audit report, click Security Audit.
You cannot rerun Security Audit or API Scan in your IDE on an API that you have opened from the platform, only view the API definition and the associated audit report.
- To rename the API definition or delete it, right-click on the API, and select the action you want.
Deleting an API permanently removes it from 42Crunch Platform. This action cannot be undone.
- To import an API to an API collection in 42Crunch Platform directly from your IDE, right-click on the collection you want and choose where to import the API definition from.
Export audit and scan reports from the IDE
If you want to store previous reports or share them to others, after auditing or scanning your API, you can export the latest report from your IDE.
- Open the API definition you want in VS Code.
- Go to the command palette in VS Code, and depending on the report you want, select either:
- 42Crunch: Export Audit Report file for the current OpenAPI file
- 42Crunch: Export Scan Report file for the current OpenAPI file
Load audit report from a file
You can open an audit report that has been exported from 42Crunch Platform to view it in VS Code without auditing the API again. This way, you can work on fixing audit issues from an audit report that, for example, someone in a different team shared with you.
- Obtain the audit report (either from someone else, or download it yourself) from 42Crunch Platform as a JSON file. See Export audit report.
- Open the API definition that the audit report was for in VS Code, either as
.jsonor.yaml. - Go to the command palette in VS Code, and select the command 42Crunch: Load Security Audit report from file.
VS Code loads the exported report from the file and you can now navigate it just as if the audit had been run in VS Code.
If you fix an issue and run Security Audit in the IDE to verify your fix, the audit report your loaded from the file is replaced by the report that the IDE extension generated.
The exported audit report is a static file: if you reload the exported report file again after fixing an issue in your API, the report still contains the details of that issue and the place you already fixed is highlighted in the editor.
Write logs in the IDE
You can set OpenAPI (Swagger) Editor to write logs of its actions directly in your IDE, for example, to help troubleshoot an problem.
OpenAPI (Swagger) Editor can write logs only about the actions the extension itself performs, logs from other components it interacts with are not logged in the IDE. Currently, only logs about Security Audit are written in the IDE logs, this will be expanded upon in the future. Logs are only written in the IDE if the Audit runtime is set to Platform, AST binary does not write logs into the IDE.
- In VS Code, open the bottom panel, and go to the Output tab.
- Open the Log Filter Selector dropdown, and select OpenAPI (Swagger) Editor.
- Click , and select the log level you want. By default, the log level is set to
INFO.