Integrate 42Crunch Platform with Visual Studio
To integrate your IDE with 42Crunch Platform, you must first install the extension OpenAPI (Swagger) Editor to your IDE. After that, you can choose either the free but limited experience, or the full experience for paying customers.
- Paying customers use IDE tokens to configure the IDE extension to access and authenticate to 42Crunch Platform. You can create IDE tokens in 42Crunch Platform, either on the landing page or in your platform account settings. This documentation describes usage for paying customers.
- Free customers can use freemium tokens in their IDEs to configure using the more limited freemium service locally. For more details on the freemium service, see Freemium User FAQ.
For more details on Visual Studio (VS) integration, see VS integration.
Visual Studio does not yet support all the same features as other IDEs, including external references. This means that you cannot audit or scan API definitions that are split into multiple files.
Create an IDE token
The extension uses a token to authenticate to 42Crunch Platform, so on the first time, you must provide one that the extension can use. If you already have an account in 42Crunch Platform or want to create one, you can create an IDE token and use that one.
- Log in or sign up to 42Crunch Platform.
- Click Create a new IDE token on the landing page.
- Copy the value of your IDE token and store it securely, you will need it to configure your IDE extension.
Update your token
If you want to use a new IDE token — or change to using IDE tokens to unlock more integration features — you can reconfigure the token that the IDE extension uses.
- Create an IDE token, and remember to copy the token value and store it securely before closing the configuration window. For security reasons you cannot view the token value later.
- In VS, click 42Crunch > Settings.
- Enter the URL your organization uses to access 42Crunch Platform. For most users, this is
https://us.42crunch.cloud. If you are not sure what your platform URL is, see Check your platform URL. - Enter the value of the new IDE token.
Your IDE will now use the new token to authenticate to 42Crunch Platform.
Configure VS and audit your API definition
You can find OpenAPI (Swagger) Editor on the Visual Studio Marketplace.
(missing or bad snippet)Use API Scan in VS
OpenAPI (Swagger) Editor also lets you scan your API operations and work on your scan configuration directly in your IDE.
Currently, GraphQL APIs are not supported.
The scan generates real traffic to the selected API endpoint and could incur costs depending on your setup.
For best results, make sure that your API definition is valid and well-formatted before you scan it. The API must be deployed so that the API endpoint is live, and the backend server your API uses must be accessible to API Scan. Otherwise the API cannot be scanned.
API Scan can have potential side effects: APIs can throw exceptions, fail, and data can be affected. As per our terms and conditions, you must only run invasive scans, such as conformance scan and fuzzing requests, against APIs that you own, and only against non-production systems and non-production data! Do not run other scan types except the non-invasive drift scan in production environment!
- Open the API you want in the IDE.
- Go to the API operation you want to scan, and click Scan. The IDE extension generates a default scan configuration based on your OpenAPI definition and opens that to a new tab. You can see all operations defined in your OpenAPI definition, listed by their
operationId. Clicking on anoperationIdon the list changes the operation in focus.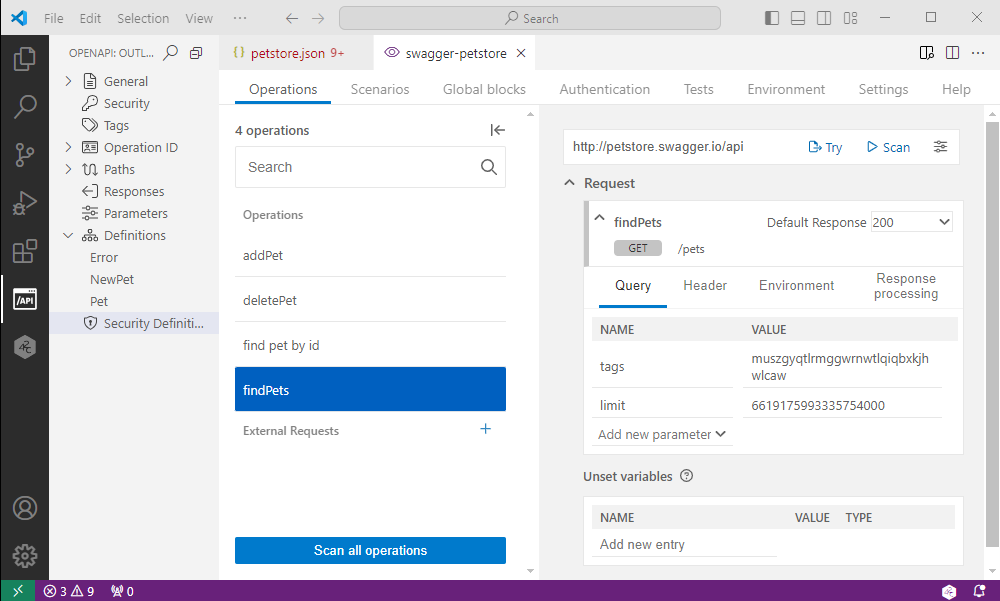
If your API uses authentication, by default the scan in the IDE expects all security requirements to be required in any scan you perform and the scan fails unless you specify all
SCAN42C_SECURITY_environment variables for them. However, if you only want to scan a single operation and do not want to specify other security requirements than what the operation in question uses, you can mark the other security requirements as not required, and switch them back to required when you are done.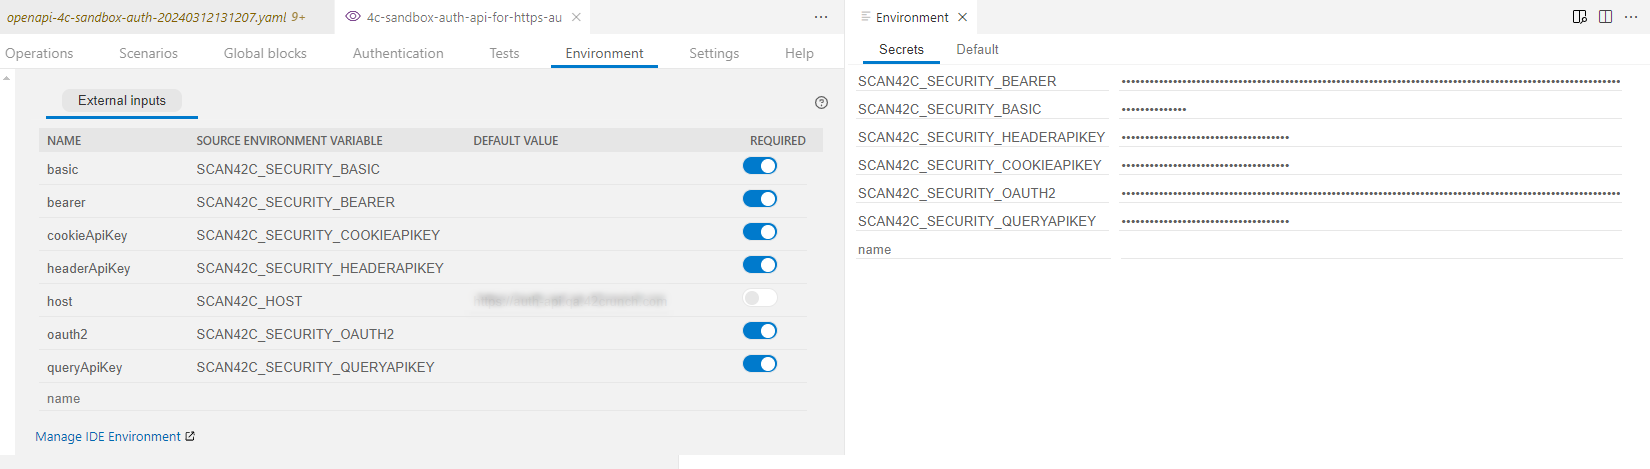
- If you want, you can also edit the scan configuration. You can, for example:
- Create and edit scenarios, global preprocessing and postprocessing block, or custom tests. For more details, see Scan scenarios.
- Populate environment variables used in your scan configuration with data from external sources, such as secrets.
- Change the scan runtime settings.
Not all scan settings might be available in the IDE.
You can find more information on API Scan directly in your IDE on the Help tab.
- To test that your happy path request for the operation works, click Try. The IDE extension generates and sends the happy path request to the operation and you can see the result underneath the settings on the Operations tab. Clicking lets you change some settings for the request.
- To run a scan, do one of the following on the Operations tab of the scan configuration:
- To scan just a single API operation, click on the
operationIdyou want, and click Scan. API Scan runs the scan only on the selected API operation, using the current scan configuration and settings. - To scan all operations in your API, click Scan all operations. API Scan scans the full API, using the current scan configuration and settings.
In both cases, API Scan provides a report on the found issues in your editor just like it does in 42Crunch Platform, and you can see how the happy path tests went.
- To scan just a single API operation, click on the
- To view results from all tests that the scan run, including the ones where no issues were discovered, click Tests. To view results only from the tests that discovered issues, click Issues found. You can also further filter the results, for example, by the endpoint, test, method, or
operationId. If filtering by severity, issues of the selected level or more severe are shown.
To fix the found issues, you can either change your API definition or API implementation, depending on what is the outcome you want, and then rerun the scan to verify the fix.
Define authentication methods in your IDE
The most common environment variable that you need for your scan configuration are credentials for authentication. If your API uses authentication, by default the scan in the IDE expects all security requirements to be required in any scan you perform and the scan fails unless you specify all SCAN42C_SECURITY_ environment variables for them. When scanning in your IDE, you can define the credentials as secrets in your IDE.
- In the scan configuration in your IDE, go to the Environment tab. You can see all environment variables already defined for your scan configuration, such as all security requirements defined in your API.
- To check which authentication methods you need for the API, check where source environment variables start with
SCAN42C_SECURITY_. These mark the credentials your API requires. - To define secrets to store the credentials in your IDE, click Manage IDE environment, and go to the Secrets tab.
- For each
SCAN42C_SECURITY_variable, click onto an empty line (where it saysname) and enter the full value of source environment variable, then enter the credential value for it. For secrets, the exact value is automatically hidden.
You have now stored the credentials for your API as secrets directly in your IDE. You can also define other environment variables in the same way, if they are not sensitive information, you can define them on the Default tab.